Winter CSA Share #1

Welcome to the 1st share of the Pitchfork & Crow 2022/2023 Winter CSA! Here’s what’s in the share this week:

  • Rosalba Radicchio – Great for robust winter salads with punchy dressings and nuts and strong cheese and citrus. Holds up to a little warming too. We’ll eat it with oven baked salmon, rice, and creamy dressing for a quick dinner. Soaking in ice water can help reduce the bitterness if needed. Click here for some tips if you think radicchio and chicories bring too much bitter to the table.
  • Romaine Lettuce Bites – Mini romaine heads, peeled down to the best leaves.
  • Red Cabbage
  • Brussels Sprouts – Pop the sprouts off the stalk and enjoy them in your favorite recipes. We usually just cut the sprouts in half, toss with a little oil/salt/pepper, and roast at 400 degrees for ~20 minutes. Don’t forget to check out the recipe index here on our website if you’re looking for suggestions.
  • Celery
  • Alpine Daikon Radishes – A short Korean daikon variety traditionally used in kimchi but tasty on salads or roasted.
  • Pinto Fingerling Potatoes
  • Sweet Potatoes – In an effort to prolong their storage life we’re giving these out unwashed. You may want to give them a soak pre-scrubbing. Enjoy!
  • Carrots
  • Yellow & Red Onions
  • Garlic
  • Candystick Dessert Delicata Squash – We tend to roast most of our winter squashes by cutting them in half and baking cut side down at 400 degrees until tender.
  • Pie Pumpkin
  • Dried Apples – After a less than stellar apple growing year we decided to buy in some apples from another local farm. These are Airlie Red apples, a red-fleshed variety discovered locally in Kings Valley, that we purchased from RainShine Family Farm located west of Corvallis. We did the drying and bagging.
Pink chicories and pink apples! (up top) plus the chicory field (bottom left) and a winter rainbow (bottom right).

Welcome to the first week of the Winter CSA! We’re excited to kick off our tenth winter CSA season and hope you are too! Whether you’re a returning member who is already well versed in seasonal eating or a new member joining us for the first time, we hope you know we’ll be trying our darndest to bring you the best organic vegetables we can grow to each CSA pick-up over the next five months.

As you know already, winter weather can be unpredictable and growing conditions are the most challenging through the winter months. Ice and snow can be game changers. Short cold days mean not much plant growth is happening at the moment so we’re relying on the planning and planting that happened last summer and fall. That’s all to say that while winter may like to keep us on our toes, there will be vegetables to eat and hopefully they’ll include a wide diversity. So far, so good!

A snowy jaunt in the woods (top) and flame weeding garlic, first walking and then with the tractor (bottom).

We often get questions about how we spent the two week break between the end of the Summer CSA season and the beginning of the Winter CSA season. After a long, rough growing season we chose to hunker down at home for a short but restful break from farm projects. Jeff focused on his willow basket hobby (if you’re in the market for a willow coffin, hit him up) and I relaxed into wrangling our house back into some semblance of order, cooking slightly more ambitious meals than we find time for during the growing season, and evaluating 2023 health insurance plans. Fun!

Of course it wasn’t all fun hobby time. We had an assortment of random projects that needed some attention. When we last left you our 90s era F150 truck needed repair. Luckily Jeff swapped out the computer and was back in action in no time, plus the repair required a quick trip to the hills to get the computer acclimated to highway speeds. Bonus! We also managed to upgrade our washer/dryer after a washer failure a few days into the break. That involved too much time spent researching the mysterious inner workings of new washing machines, eventually discovering we couldn’t diagnose the problem properly to repair ourselves, realizing no one will repair the brand, and laying down some money for new repairable machines that are equally (if not more) mysterious. And Jeff sold his duck flock on Craigslist to a small farm in Oregon City looking to up their duck game. Herding and catching 22 very wary ducks in muddy conditions is definitely a project.

We did ease back into farm tasks too. Jeff worked on flame weeding the garlic first with a handheld propane torch and then with a wider propane torch with multiple burners that he attached to the tractor. Hopefully he can keep the grass at bay long enough for a dry spell when we can truly cultivate to clean up the beds. We also moved the dry corn out of the prop house where it had been drying down since harvest. Not wanting it to languish in the barn I went ahead and shelled it, resulting in 300ish pounds of dry corn for future flour/polenta milling. Plus there was some apple drying, root harvesting and washing, composting, barn cleaning, bin washing etc. We’ve still got a long list of winter projects to get through but it was nice to get a slow start on some of them.

That’s all to say it was a successful working staycation and we’re looking forward to getting into the swing of the Winter CSA!

Enjoy the vegetables and we’ll see you here again in two weeks!

Your farmers,
Carri Heisler & Jeff Bramlett

.

Here are a few recipes to get you inspired:

Grilled Chicken Caesar Lettuce Wraps

  • For the Caesar dressing:
  • 1 cup mayonnaise
  • 1 (2-ounce) can anchovy fillets, drained, and minced
  • 2 lemons, juiced
  • 2 garlic cloves, smashed, peeled, and minced
  • 2 tablespoons olive oil
  • 1 tablespoon balsamic vinegar
  • 1 1/2 teaspoons Worcestershire, plus more to taste
  • 1 teaspoon freshly ground black pepper
  • 1 pinch kosher salt, plus more to taste
  • For the chicken lettuce wraps:
  • 4 chicken breasts, halved horizontally
  • 6 slices bread, ideally crusty and rustic
  • 2 tablespoons olive oil, plus more as needed
  • 1 small head radicchio, halved, cored, and thinly sliced
  • 1 cup grated Parmesan
  • 2 tablespoons drained capers
  • 3 hearts of romaine, broken into leafs for lettuce cups

For the Caesar dressing:

Make the Caesar dressing. Combine all ingredients in a bowl. Taste and adjust accordingly.

For the chicken lettuce wraps:

Marinate the chicken. Add the chicken breasts to a big plastic bag and add 1/2 cup Caesar dressing. Mush around to completely coat. Marinate for at least 1 hour in the fridge or up to 1 day.

Get your grill going. For charcoal: Set up for one-zone, high-temperature cooking. For gas: Heat to high until the temperature reaches about 600° F. Make sure the grill grates are clean, then lightly oil them.

Grill the chicken over direct heat for 3 to 4 minutes per side, until charred on the outside and cooked (about 165° F) on the inside. Transfer to a plate to rest.

Now grill the bread. First drizzle with olive oil, then grill over direct heat until charred, a couple minutes per side. Transfer to a plate to cool and crisp.

Chop the chicken into chicken chunks. Add to a bowl along with the radicchio, parmesan, and capers. Dress with the remaining Caesar dressing—use however much feels right to you. Taste and adjust salt accordingly.

Tear the grilled bread slices into crumbs.

Serve as such: lettuce cups on one plate, chicken salad in a bowl, crumbs on another plate. To assemble: Fill a lettuce cup with chicken salad and top with breadcrumbs.

From Food52.com by Emma Laperruque, https://food52.com/recipes/77670-grilled-chicken-caesar-lettuce-wraps

Coconut & Chile Braised Winter Squash

  • 2 to 3 pounds winter squash (such as 1 large butternut, or 2 medium delicata)
  • 3 tablespoons olive oil, divided
  • Kosher salt plus freshly ground black pepper, to taste
  • 1 medium yellow onion, finely chopped
  • 3 garlic cloves, minced
  • 1 tablespoon ground coriander
  • 1 tablespoon minced fresh rosemary
  • 1 13.5 ounces can unsweetened coconut milk (full fat)
  • 3 tablespoons chile sauce, such as harissa, or to taste (see author note)
  • Couscous or rice, for serving

To prep the squash: Peel the squash if using butternut; no need to peel delicata. Halve lengthwise and remove seeds and stringy flesh. Cut into 3/4-inch chunks.

On a sheet pan, toss the squash with about 1 tablespoon olive oil, or just enough to coat. Season generously with kosher salt and pepper.

Heat the broiler with an oven rack about 4 to 5 inches from the heating element. Broil the squash until nicely charred on the first side, about 3 to 4 minutes, then flip and broil about 1 to 2 minutes longer. (The total time will depend on the intensity of your broiler, so keep a close eye on the squash!)

In a deep skillet or Dutch oven, heat 2 tablespoons olive oil over medium heat. Sauté onion until tender, about 5 minutes (a little browning around the edges is fine) then add the garlic, coriander, and rosemary and sauté a minute longer. Add the charred squash, stirring to coat it evenly in the oil.

Add the coconut milk, harissa, and another pinch or two of salt, and bring to a simmer. Half cover the pan with the lid, and braise for about 20 minutes, or until the squash is fork tender, adjusting the heat as necessary to maintain a gentle simmer. Add a little water (using the empty can to get every last bit of coconut milk!), as needed, if the sauce starts to get a little dry.

Adjust salt to taste, and add more chile sauce if desired. Serve warm with couscous or rice as a complete meal, or as a side to virtually any protein.

From Food52.com by EmilyC, https://food52.com/recipes/84649-coconut-braised-winter-squash-recipe

Sweet Potato Nachos

  • Nachos
  • 2 pounds (about 6 medium) sweet potatoes, scrubbed
  • 1/4 cup olive oil
  • Smashed Black Beans (see recipe below)
  • 16 ounces (about 4 cups) shredded cheese (I like a mix of Monterey Jack, pepperjack, and yellow cheddar)
  • 1/3 cup salsa or pico de gallo
  • 1 or 2 ripe avocados, sliced (or, for a bit more excitement, 1 or 2 batches of the Chunkiest, Herbiest, Greenest Guacamole)
  • For serving: thinly sliced (daikon) radishes, shredded cabbage, thinly sliced raw or pickled jalapeños, thinly sliced raw or pickled onions, thinly sliced scallions, sour cream (for dolloping), gently crushed tortilla chips, roughly chopped cilantro
  • Lime wedges, for serving
  • Smashed Black Beans
  • 2 tablespoons olive oil, divided
  • 3 garlic cloves, smashed
  • 1 yellow onion, roughly chopped
  • Kosher salt and freshly ground black pepper
  • 1 teaspoon hot smoked paprika
  • 2 teaspoons ground cumin
  • 1 (15-ounce) can black (or pinto) beans, liquid reserved
  • 1/2 tablespoon red wine vinegar

Nachos

Heat the oven to 450ºF.

Slice the (unpeeled) sweet potatoes into rounds about 1/4 inch thick. Err on the thin side for more charred, crispy potatoes; thicker for creamier—both are excellent!

In a large bowl (or directly on two rimmed sheet pans) toss the potatoes with olive oil and season well with salt and pepper. Arrange in a single layer. Bake, with one pan on a rack in the top of the oven and the other on the bottom, for 12 to 14 minutes, until well charred. Flip the potatoes, swap the positions of the sheet pans, and continue cooking until cooked through and charred on the other side, another 10 to 15 minutes. Remove the trays from the oven and toss the potatoes to ensure none are stuck to the pan.

Reduce the heat to 350ºF. Spread about half the beans and sprinkle half the cheese over one tray of potatoes. Return the tray to the oven and cook until the cheese is melted, about 5 minutes.

Remove the sheet pan from the oven. Building on the one tray, layer the remaining sweet potatoes over the melted cheese. Cover the second layer of potatoes with spoonfuls of the beans (use the rest of the batch or however much you’d like). Sprinkle over the remaining cheese and return to the oven for another 5 minutes, or until the cheese is melted.

Dot the surface of the nachos with large spoonfuls of salsa or pico de gallo. Scatter avocado over the nachos (or dot with large spoonfuls of guacamole). Finish with the remaining desired toppings and serve immediately, with lime wedges for squeezing.

Smashed Black Beans

While the potatoes are cooking, make the beans. Heat 1 tablespoon of oil in a medium saucepan over medium-high heat. Add the garlic and onion and season with salt and pepper.

Cook, stirring regularly, until translucent, about 5 minutes. Make a well in the center and add the remaining tablespoon of oil. Stir in the paprika and cumin and let sizzle for 30 seconds, until the spices are fragrant.

Dump the entire can of beans (yes, liquid, too!) into the pot. Fill the can halfway with water, pour into the pot as well, and stir to combine. Bring the mixture to a boil, then reduce the heat to medium-low and cook, stirring occasionally, until thickened, about 20 minutes.

Taste and season with salt and pepper. Use the side of a spoon or spatula to gently smash the beans up a bit. Let cool slightly, then mix in the vinegar before serving.

From Food52.com by Rebecca Firkser, https://food52.com/recipes/84941-best-sweet-potato-nachos-recipe

Summer CSA Share #25

Welcome to the 25th share of the Pitchfork & Crow 2022 Summer CSA! Here’s what’s in the share this week:

  • Salad Mix – A mix of lettuces.
  • Bok Choy
  • Collards – Collards can be used like kale or cabbage. They can be cooked down southern style, but they’re delicious in other recipes too. Check out the Collard Quiche recipe below and this vegan citrusy collard recipe we’ve posted in the past.
  • Brussels Sprouts – Pop the sprouts off the stalk and enjoy them in your favorite recipes. Don’t forget to check out the recipe index here on our website if you’re looking for suggestions.
  • Thyme
  • Celery – Yep, more celery. It’s soup season after all.
  • Mixed Potatoes
  • Carrots
  • Yellow Onion
  • Leeks
  • Garlic
  • Poblano Peppers
  • Aji Marchant Peppers – These peppers have an intriguing history that you can read about here. Though spicy when yellow and under-ripe they get hotter as they mature to red.
  • Candystick Dessert Delicata Squash
  • Polenta (aka grits) – We grow a flint corn called Cascade Ruby Gold that grinds partially into flour and partially into polenta when milled. This week we’re sharing polenta and next week we’ll share the flour. You can use this polenta in recipes calling for uncooked polenta or corn grits. We like to cook it in our rice cooker at a 1 cup polenta to 3 cups water ratio. It’s even better if you stir in some butter and cheese once cooked. We’ve heard from members that the rice setting on an instant pot works too.
Full moon this past week. The chicories are coloring up thanks to the cold nights but thankfully the celery was safe and sound under row cover.

Frosty mornings have been greeting us this past week. Thankfully the greenhouses and row cover have been keeping the frost at bay for the tender crops still in the field. Back on November 4th we passed into the Persephone period, when we experience fewer than 10 hours of daylight each day. Plants slow their growth almost to a standstill this time of year. Like the plants slowing down, we’re also looking forward to slowing down a little in the coming weeks.

This week we’re saying good bye to half of those members who chose the biweekly share option. It’s the penultimate week for everyone else as next week we’ll wrap up the Summer CSA season for good. Where have the past six months gone? Despite the wet spring and extended hot fall we’ve still managed to eat through a seasonal bounty of vegetables. From snap peas and radishes last June to tomatoes and corn this summer and now to winter squash and potatoes this fall the vegetables have kept coming. We hope you’ve enjoyed the season despite its challenges. As we approach Thanksgiving and officially finish the season next week we’re especially thankful for your continued support. We couldn’t do this without you!

Collard harvest on a beautiful afternoon.

This past week we had just enough dry weather to complete the potato harvest! We now have a cooler full of potatoes that will help see us through the winter months. We also milled dry corn for flour and polenta, which we’re sharing with you this week and next. And we managed to get into a fix with our 90s era Ford F150 requiring a tow and a mysterious issue we have yet to fully diagnose. Now we’ve added an automotive challenge to our end of season To Do list. Fun with 1990s computer technology! Perhaps it’s time to think about updating the fleet.

This week we’ll be preparing for the final week of the CSA season. Here’s our tentative harvest list for next week as you begin your Thanksgiving shopping. This list may change as we get closer to harvest day, but it should look very similar.

  • Brussels Sprouts
  • Long Pie Pumpkin
  • Onions
  • Garlic
  • Sage
  • Parsley
  • Potatoes
  • Carrots
  • Mustard Greens
  • Celeriac
  • Sweet Potatoes
  • Chicory
  • Kale
  • Corn Flour

We’ll see the majority of you next week for the final share of the Summer CSA!

Enjoy the vegetables and we’ll see you here next week!

Your farmers,
Carri Heisler & Jeff Bramlett

.

Here are a few recipes to get you inspired:

Collard Greens Quiche

  • Filling
  • 3/4 pound Bacon, Diced
  • 2 cups Collard Greens, De-Stemmed, Cooked and Chopped
  • 1 Small Yellow Onion, Diced
  • 6 Eggs
  • 2 cups Heavy Whipping Cream
  • 4 ounces Gruyere, Shredded
  • 2 ounces Sharp Cheddar, Shredded
  • Pinch of Nutmeg
  • Salt & Pepper to Taste
  • Crust
  • 1 Cup plus 3 Tablespoons All-Purpose Flour
  • 6 tablespoons Cold Unsalted Butter, Cubed
  • 1 Large Egg, Beaten
  • Pinch of Salt

In a food processor, combine the flour, butter and salt until the mixture is crumbly.-this should only take a few pulses. Add the egg, and pulse a few more times until the dough resembles little peas.

Remove dough from processor and shape into a ball. Wrap in plastic wrap and refrigerate for one-hour. When chilled, remove dough and roll out onto a lightly floured work-surface. Roll out the dough to be 2″ larger than the size in inches of your quiche pan.

Fit dough into the quiche pan, remove excess and prick with a fork all over and then refrigerate for 30 minutes before baking. Preheat oven to 350 degrees.

In a skillet, over medium-low heat cook diced bacon until crisp. Remove bacon and drain. Pour out the bacon grease and add the diced onion to the same pan. Cook onions until soft and transparent. Add the bacon and collards to the onion pan. Toss to combine.

In a medium bowl, whisk the eggs and add in whipping cream, nutmeg and salt & pepper. Add the bacon mixture. Stir to combine.

Remove crust from refrigerator. Sprinkle shredded Gruyere and cheddar as the bottom (first) layer in the crust. Pour in the cream mixture and spread evenly.

Bake quiche for 40 – 55 minutes until set. Remove and let cool for 10 minutes. Slice and serve!

From Food52.com by Table9, https://food52.com/recipes/10180-beloved-greens-quiche

Squash with Parmesan and Walnuts

  • 2 tablespoons olive oil
  • 1 teaspoon maple syrup
  • 1 1/2 pounds Delicata squash, cut in half lengthwise, cored, then cut into 1/2 inch moons
  • 1/2 teaspoon kosher salt
  • 2 tablespoons walnuts, chopped
  • 1/4 cup Parmesan cheese, grated
  • 2 tablespoons parsley, chopped

    Preheat over to 400°F.

    In a small bowl, whisk together olive oil and maple syrup. Place squash moons in a medium-sized bowl and pour olive oil mixture on top. Add salt and toss to coat. Transfer squash to a baking sheet and spread out so it’s in a single layer and there are no overlapping moons. Bake for 15-20 minutes, flipping halfway, until squash is soft and nicely browned.

    In the meantime, toast walnuts in a small saucepan over low heat until they are about a shade darker and smell nuttier, about 5-10 minutes.

    Arrange squash on a platter and sprinkle with toasted walnuts, Parmesan, and parsley. Serve immediately.

    From Food52.com by Vicky | Things I Made Today, https://food52.com/recipes/63171-squash-with-parmesan-walnuts

    10 Minute Garlic Bok Choy

    • 1 tablespoon vegetable oil
    • 5 cloves garlic – minced
    • 2 large shallots – minced
    • 2 pounds baby bok choy – halved or quartered
    • 2 tablespoon soy sauce
    • 1 teaspoon sesame oil
    • 1 teaspoon crushed red pepper – optional

    Add the oil to a large wok or skillet over medium-high heat. Swirl to coat the entire surface of the pan.  Add the garlic and shallots, stirring continuously for 1-2 minutes, or until fragrant.

    Add the bok choy, soy sauce, and sesame oil. Toss to coat and cover. Cook for 1-2 minutes, uncover and toss, and then cover and continue to cook until bok choy is cooked to desired doneness (approximately 3-5 minutes more).

    Sprinkle with crushed red pepper and serve immediately. Enjoy!

    From The Forked Spoon by Jessica Randhawa, https://theforkedspoon.com/bok-choy-recipe/

    Northwest Smoked Salmon Chowder

    2 tablespoons olive oil
    1 tablespoon butter
    1 teaspoon kosher salt
    1/2 teaspoon black pepper
    1 small onion, diced
    2 large leeks, sliced, soaked in water to remove the grit
    2 stalks celery, diced fine
    4 garlic cloves, minced
    3 cups potatoes, chopped, preferably Idaho or Russet (450g)
    1/2 teaspoon fennel seeds
    2 bay leaves
    2 tablespoons tomato paste
    1 15-oz can chopped tomatoes, drained
    3 cups fish stock (chicken or veg stock works, too)
    3 tablespoons capers, plus 1 tablespoon of brine
    4 ounces cream cheese, cut into cubes
    1/2 cup half and half
    1 tablespoon hot sauce (I used Texas Pete’s)
    1 cup hot smoked salmon, shredded
    1/4 cup flat-leaf parsley, diced for garnish
    lemon wedges, for garnish
    Sourdough bread bowls for serving, or slices of sourdough bread for dipping

    Heat the butter and olive oil in a large soup pot or Dutch Oven over medium heat. Add the onions, leeks, celery, salt and pepper and sauté, stirring, for 5 minutes, or until the onions turn translucent.

    Add the garlic and potatoes and stir. Add bay leaves and fennel seeds, stir. Add tomato paste and let toast for a minute. Stir in chopped tomatoes, stock, and capers. Let simmer for 10 to 15 minutes or until potatoes are cooked all the way through.

    Remove the bay leaves and add the cream cheese, let it melt into the soup. Add the half & half and stir it until fully incorporated. When the soup just begins to simmer stir in the smoked salmon and stir until heated through. Add the hot sauce and combine.

    Serve chowder in sourdough bowls or with sourdough bread on the side for dipping. Garnish with chopped parsley, lemon wedges, and hot sauce on the side.

    Pro tip: Chowder tastes better the next day.

    From Food52.com by Catherine Lamb, https://food52.com/recipes/75626-northwest-smoked-salmon-chowder

    Summer CSA Share #24

    Welcome to the 24th share of the Pitchfork & Crow 2022 Summer CSA! Here’s what’s in the share this week:

    • Salad Mix – A mix of lettuces and spinach.
    • Green Cabbage – Big heads coming your way this week. Have you roasted cabbage? Or made sauerkraut? Or made cabbage and noodles? Or checked out the jalapeno coleslaw recipe down below?
    • Small Broccoli Heads
    • Celery
    • Alpine Daikon Radishes – A short Korean daikon variety traditionally used in kimchi but tasty on salads or roasted.
    • Magic Molly Purple Fingerling Potatoes – Purple on the outside and inside too, these are great roasted with other root vegetables.
    • Mixed Red & Yellow Beets
    • Yellow Onion
    • Bunching Onions
    • Sweet Peppers
    • Jalapeno Peppers
    • Green Tomatoes We’re wrapping up the tomato season with a harvest of all the remaining unripe fruit. You can try to ripen any fruit with some coloring by leaving it out in your kitchen. Unripe fruit can be used in fried green tomato recipes or check out the green tomato cake recipe down below.
    • Festival Acorn Squash
    A muddy daikon radish harvest yesterday.

    After a very hot and dry October it appears the weather has a different pattern in store for November. The farm weather station reports 4.68″ of rain since last Tuesday and we’re about to see low temps in the 20s and low 30s for the next week. It’s been an abrupt switch from summer to winter weather.

    We spent the past week readying the farm for the upcoming cold snap. We focused on continuing the root harvests by digging more potatoes and Jeff harvested the last two beds of beets during last Friday’s big wind/rain storm. He’s a real go getter. I managed to avoid that storm by focusing on canning/roasting the last of the tomatoes and getting our 2023 seed potato order wrapped up. Saturday was the calmest day this past week and we were both back at it, managing to get the remaining celery, turnips/radishes, and celeriac covered with frost protection row cover. Fingers crossed we’ll have celery for future shares. Then we split up; I took on the beet washing project and Jeff put up end walls on one of the greenhouses that has vulnerable greens planted inside. Sunday we focused on getting the storage onions and garlic into the barn now that the sweet potatoes have taken over the germ chamber storage area. It was a wet day for such a task but it worked out. While I processed garlic Jeff washed potatoes for this week’s share. Now we’re back to the harvest scramble and hoping we did enough ahead of the cold temps.

    Irrigation lines have been drained, crops are covered, greenhouses are enclosed, coolers are filling up with storage crops. I guess it really is November. Wasn’t it just 90 degrees?

    Cabbage packing (left) and a glimpse of the farm looking east. There’s already snow in the hills! (right).

    In the week ahead we’ll be continuing the potato harvest, harvesting other roots for storage, and working towards wrapping up this season. Not counting this week’s share we have two more weeks remaining in the Summer CSA season. There are still lots of tasty fall vegetables we’ve got planned for you. Hurrah for seasonal eating!

    Enjoy the vegetables and we’ll see you here next week!

    Your farmers,
    Carri Heisler & Jeff Bramlett

    .

    Here are a few recipes to get you inspired:

    Green Tomato Crumb Cake

    • Batter
    • 2 cups plus 1 tablespoon (248 grams) all-purpose flour, divided, plus more for preparing the pan
    • 1/2 cup (106 grams) dark brown sugar
    • 1/2 cup (100 grams) granulated sugar
    • 1 teaspoon baking powder
    • 1 teaspoon baking soda
    • 1 teaspoon ground cinnamon
    • 1/2 teaspoon kosher salt
    • 1/4 teaspoon ground nutmeg
    • 1/4 teaspoon ground cloves
    • 1 large egg, at room temperature
    • 1 teaspoon vanilla extract
    • 1 cup (225 grams) buttermilk, at room temperature
    • 2/3 cup (151 grams, about 11 tablespoons) unsalted butter, melted and cooled
    • 2 1/2 cups (about one 10-ounce) medium diced green tomato
    • Topping
    • 1/2 cup (106 grams) dark brown sugar
    • 1/2 cup (60 grams) all-purpose flour
    • 1/2 teaspoon ground cinnamon
    • 3 tablespoons (40 grams) cold unsalted butter, cut into 1/4-inch cubes

    Heat oven to 350°F. Spray or butter and flour a 9-inch springform pan.

    For the batter: In a large bowl or the bowl of a stand mixer fitted with the whisk attachment, whisk together 2 cups (240 grams) or the flour, both sugars, baking powder, baking soda, salt, and spices.

    In a medium bowl, whisk together the egg, vanilla, buttermilk, and cooled butter.

    Pour the wet ingredients over the dry ingredients. Using an electric hand mixer or a stand mixer fitted with the paddle attachment, beat until smooth. Toss the tomatoes with the remaining 1 tablespoon (8 grams) flour. Fold in the tomatoes. Pour into the prepared pan.

    For the topping: In a medium bowl, stir together the sugar, flour, and cinnamon. Use your fingertips to work in the butter until large, shaggy crumbs form.

    Sprinkle the topping over the batter, pressing the crumbs lightly into the top.

    Bake for about 55 to 60 minutes, until a thin knife or cake tester inserted into the center comes out clean.

    Cool in the pan on a wire rack for 15 minutes. Loosen the cake from the pan and slide it onto the rack to cool completely. Slice into wedges and serve. Store leftovers in an airtight container for up to 2 days.

    From Food52.com by Rachel Rappaport, https://food52.com/recipes/88159-green-tomato-crumb-cake-recipe

    Sweet & Smoky Beet Burgers

    • 1 yellow onion
    • 3 tablespoons grapeseed oil, plus extra for searing
    • 1 cup peeled and grated raw beets (approximately 1 small beet)
    • 3 cloves garlic, crushed
    • 1 cup walnuts
    • 1/2 cup golden raisins
    • 2 teaspoons sweet smoked paprika
    • 1/2 cup cooked green lentils, rinsed and drained
    • Sea salt and freshly ground pepper
    • 2 cups cooked short-grain brown rice or white sushi rice, at room temperature
    • 1 egg

    Slice the onion to a thickness of 1/4 inch. In a medium skillet, sauté the onion in the oil over medium-high heat for 10 to 15 minutes, until it starts to darken and caramelize. Turn down the heat slightly and add the beets along with the garlic, walnuts, raisins, and paprika, and cook for 10 minutes, stirring often.

    Transfer the contents of the skillet to a food processor and pulse several times until chunky. In a large bowl, combine the onion mixture with the lentils, 2 teaspoons salt, and 1 teaspoon pepper. Replace the food processor without washing and add the rice and egg, and pulse to form a coarse puree. Add the rice mixture to the onion-lentil mixture and mix well with your hands.

    Lightly oil your hands and divide the dough into 8 portions. Shape each portion into a patty just under 1 inch thick.

    Heat a heavy-bottomed skillet over medium-high heat and add oil to coat the bottom. Place the burgers in the skillet and cook undisturbed for 5 minutes. Gently flip the burgers and turn down the heat to low. Cover and cook for 10 minutes, until the burgers have a firm, brown crust. Serve hot with your favorite condiments.

    From Food52.com by Louisa Shafia, https://food52.com/recipes/22553-sweet-and-smoky-beet-burgers

    Chicken Udon Soup

    • Broth
    • 1 1/2 to 1 3/4 pounds bone-in chicken thighs and/or legs, skin removed
    • 1 (4-ounce) piece Korean mu or daikon radish, about 3-inch diameter x 1-inch height, peeled
    • 1 medium yellow onion, peeled and halved at the root
    • 1 head garlic, cloves separated and peeled (12 to 14 cloves)
    • 2 whole scallions
    • 1 teaspoon whole black peppercorns
    • 1 (1/2-inch) piece ginger, unpeeled and sliced into thick planks
    • 1 (4×6-inch) piece dashima konbu kelp, or several smaller pieces adding up
    • Soup Assembly
    • 1 teaspoon toasted sesame oil
    • 2 blocks frozen udon noodles (about 8 to 9 ounces each), or about 1 pound fresh Korean udon/jjajang noodles
    • 3 tablespoons soy sauce
    • 1 tablespoon kosher salt, plus more to season chicken and to taste
    • Freshly cracked black pepper, to taste
    • 2 thinly sliced scallions (both green and white parts), for garnish

    Make the broth: In a large pot, add chicken pieces, mu/daikon radish, onion, garlic cloves, the 2 whole scallions, peppercorns, ginger slices, and kombu kelp. Slowly pour in 8 cups (2 quarts) of cold water. Bring to a boil over high heat. Start skimming any white foam or scum that comes to the top. Reduce heat to medium-low. Cover with lid slightly ajar, and cook for around 25 minutes until the chicken and daikon are done; skim off any scum every so often.

    15 minutes into the broth cooking time, bring a separate, medium-size pot filled with water to boil for the udon.

    Meanwhile, when the chicken broth is done, remove the chicken pieces and mu/daikon radish and let cool on a cutting board. Strain the rest of the broth into another similarly (or slightly smaller) sized pot. Discard aromatics. Season the chicken broth with soy sauce and salt, adjusting to taste. Keep strained chicken broth hot over a low heat.

    Prepare the chicken and mu/daikon radish: Once cool enough to handle, use two forks or your hands to shred the chicken into bite-sized pieces. Discard the bones. Put the chicken in a bowl or storage container, season with toasted sesame oil, salt, and pepper. Set aside. Cut the radish into bite-sized pieces; set aside.

    Cook udon noodles according to package instructions (usually 45 to 60 seconds for frozen udon blocks). They are already cooked, so you are just warming them through and gently releasing them from their caked state with tongs or chopsticks. It’s important not to overcook them. Drain in a colander.

    Divide drained udon noodles among soup bowls. Ladle hot broth over the udon. Top each bowl with cut mu/daikon radish pieces and a small handful of shredded seasoned chicken. Garnish with the thinly sliced scallions and freshly cracked black pepper. Serve immediately.

    From Food52.com by Hana Asbrink, https://food52.com/recipes/87476-chicken-noodle-soup-recipe-with-udon-garlic-ginger

    Pan-Seared Rib Eye with Jalapeno Coleslaw

    • For the steak:
    • 1 cup cilantro stems, leaves reserved for garnish
    • 2 large jalapeños
    • 2 large garlic cloves
    • 1 1/2 teaspoons kosher salt
    • 1/2 teaspoon freshly ground black pepper, plus more for garnish
    • 1/4 cup olive oil, plus 1 teaspoon for cooking steak
    • 1 (1 1/2–pound) bone-in rib-eye steak, about 1 1/2 inches thick
    • 1/2 teaspoon rice vinegar
    • 1/4 teaspoon granulated sugar
    • For the coleslaw:
    • 1/4 pound green cabbage, finely shredded (about 1 cup)
    • 1 large jalapeño, deseeded and cut into thin strips
    • 1 tablespoon olive oil
    • 1 teaspoon rice vinegar
    • 1/2 teaspoon granulated sugar
    • 1 pinch celery seed

    First, marinate the steak: In a blender or food processor, blitz the cilantro stems, jalapeños, garlic, salt, pepper, and olive oil until smooth. Transfer 1/4 cup of the marinade to a small resealable container and refrigerate (you’ll turn it into a sauce later). Add the steak to a large zip-top bag and pour in the rest of the marinade. Seal and smoosh everything around so the meat is fully covered in the green sauce. Set the bag on a plate in the fridge to marinate for as little as 4 hours, and as much as 8 to 12 hours or overnight. (If you’re in a hurry, you could also leave the steak to marinate at room temperature for 30 minutes, then proceed straight to cooking.)

    Heat a large skillet, preferably cast iron, over medium-high heat until very hot. Add 1 teaspoon of olive oil, followed by the steak, and sear on that first side for 6 to 8 minutes. Flip, then cook for another 4 to 6 minutes, or until the internal temperature of the thickest part of the steak reaches 130°F for medium-rare (make sure your instant-read thermometer isn’t hitting the bone or any fat pockets, which will obscure this reading). Transfer the steak to a wooden cutting board and let rest for at least 10 minutes.

    Meanwhile, make the coleslaw: In a medium bowl, toss together the cabbage, jalapeño, olive oil, rice vinegar, sugar, and celery seed and set aside.

    When the steak has fully rested, carve it as thinly or as thickly as you like. But when doing this, just be sure to cut against the grain, which is to say: perpendicular to the parallel muscle fibers of the meat (the shorter these strands are, the tenderer the steak will feel as you eat). On a rib eye, these fibers usually run top to bottom across the surface, which is why I like to carve it on the diagonal. (Save the bone for nibbling on later.)

    Remember that 1/4 cup of reserved marinade? Stir in the rice vinegar and sugar, and transfer the sauce to a large plate, flattening it with the back of a spoon. Lay the carved steak slices over the sauce and garnish liberally with the whole cilantro leaves. Grind more fresh black pepper over top if you’d like, and enjoy with the jalapeño coleslaw.

    From Food52.com by Eric Kim, https://food52.com/recipes/83926-pan-seared-rib-eye-steak-recipe

    Summer CSA Share #23

    Welcome to the 23rd share of the Pitchfork & Crow 2022 Summer CSA! Here’s what’s in the share this week:

    • Salad Mix
    • Arugula
    • Rainbow Chard
    • Broccoli Bits
    • Hakurei Salad Turnips – These are mild enough to eat raw on salads but we also enjoy roasting them with other root vegetables. Don’t forget to eat the greens!
    • German Butterball Potatoes
    • Red Onions
    • Garlic
    • Sweet Peppers
    • Shishito Peppers – The shishitos are the roulette peppers we’ve shared in the past where 1 in 10 can be hot. They’re delicious blistered in hot oil and salted as a snack or chopped up and thrown into other dishes. We’ve enjoyed them in breakfast burritos.
    • Tomato – It’s true, we found one more ripe tomato out there to share. Green tomatoes coming at you next week.
    • Gill’s Golden Pippin Acorn Squash – A tasty little acorn squash that’s just the right size for a single serving.
    Check out that chard!

    The season is quickly winding down as Thanksgiving, and the final share of the Summer CSA season, is just three weeks away now. The rain has settled in, the temps have dropped, the days are getting shorter and shorter. Whew! What a roller coaster this growing season has been. We’re looking forward to the break but we’re also already thinking about improvements for next year.

    Big harvests: Aji Marchant Hot peppers (top left), sweet peppers (top right), German Butterball potatoes (bottom left), and sweet potatoes (bottom right).

    Although the weather forecast had suggested several rainy days last week, we had a bit of a reprieve and were able to make some progress in the digging of potatoes, both sweets and non-sweets alike. We finished getting the sweet potatoes out of the ground and they’re now finishing curing at a balmy 85 degrees in the temperature regulated germination chamber. We also spent time digging more regular potatoes for storage. We have about a third left to dig in the coming weeks. Slowly but surely we’ll get through that project.

    We’ve got our first frost warning of the season coming up Wednesday night, though it’s looking less likely as we get closer to Wednesday now. Most sensitive crops are either in greenhouses at this point or done for the season already, so there isn’t much prep to do ahead of a frost. I did spend time Sunday harvesting the last of the peppers though. We had a strange pepper year but it’s nice to have what’s left out of the field and ready to be shared in the next few CSA shares.

    Fava bean planting!

    In addition to harvesting and more harvesting we managed to plant a bed of lettuce and a bed of bunching onions into a greenhouse for winter eating. We also planted a couple of beds of fava beans for next spring. Favas are one of the last things to go in the ground, and we’re generally ready to be done with planting by the time they roll around. But they sure are nice to have in June! Jeff also managed to sow some cover crop seed in some open areas and do quite a bit of mowing of past crops. It’s crazy how quickly the landscape view can change with a single pass of the flail mower.

    In the week ahead we’ll be tackling more potatoes in between rain storms. It looks like a rainy week ahead so we’ll be taking on some indoor projects too. There’s some weeds we’d like to get to in a couple of greenhouse beds. It’s also time to think about our potato order for next year to make sure we’re at the top of the list for seed potato supplies. It’s a never ending potato cycle: harvest, plant, harvest, plant. I guess that’s the nature of farming though.

    Enjoy the vegetables and we’ll see you here next week!

    Your farmers,
    Carri Heisler & Jeff Bramlett

    .

    Here are a few recipes to get you inspired:

    Potato Salad with Arugula & Dijon Vinaigrette

    • 1/2 small red onion, peeled and roughly chopped
    • 2 pounds new potatoes, scrubbed and cut into bite-sized pieces
    • Salt
    • 1 tablespoon rice vinegar
    • Freshly ground black pepper
    • 2 tablespoons finely chopped chives
    • 3 cups arugula, stems removed, washed and dried and very roughly chopped
    • 2 tablespoons red wine vinegar
    • 1 tablespoon Dijon mustard
    • 5 tablespoons good olive oil

    Put the onion in a small bowl and cover with cold water (this will remove some of the bite). Put the potatoes in a large pot of generously salted water. Bring to a boil over high heat.

    Lower the heat so the water is barely simmering and cook for about 10 minutes, until you can pierce the potatoes with the tip of a sharp knife and it slips out easily. Drain the potatoes well and pour them into a large bowl.

    Gently toss the warm potatoes with the rice vinegar, 1/4 teaspoon salt, and 1/2 teaspoon pepper. Add the chives, arugula and red onion and stir through.

    Whisk together the red wine vinegar, mustard and olive oil in a small bowl. Add salt and pepper to taste. Pour over the potato mixture and toss to combine. Serve warm or keep covered at room temperature for up to an hour.

    From Food52.com by Merrill Stubbs, https://food52.com/recipes/12198-potato-salad-with-arugula-dijon-vinaigrette

    Chard Salad with Breadcrumbs and Parmesan

    • 1 bunch Swiss chard
    • 1 lemon
    • 1/2 cup extra virgin olive oil
    • Salt
    • 1 1/2 cups fresh breadcrumbs
    • 1 clove garlic, minced
    • 3/4 cup grated Parmesan

    Wash and dry the chard and remove the stems from the leaves. Set aside. Zest and juice the lemon.

    Combine the lemon juice (you should have about 2 1/2 tablespoons), 1 teaspoon of the lemon zest and a few generous pinches of salt in a small bowl. Slowly whisk in 1/4 cup of the olive oil. Set aside.

    Warm the remaining 1/4 cup olive oil in a small, heavy skillet over medium heat. Add the breadcrumbs and cook, stirring frequently, until they are crisp and golden brown (about 5 minutes). Be careful not to burn them! Stir in the garlic and let them toast for another minute, then remove from the heat.

    Separate the chard leaves from their stems. Finely chop the stems. Stack a few of the leaves on top of each other, roll them like a cigar and cut the cigar into thin (1/8-inch) ribbons. Repeat until all the leaves are shredded. Put the chard stems and leaves into a large bowl and toss gently with the Parmesan and about 2/3 of the lemon dressing. Taste and add more dressing if you like. Toss in the toasted breadcrumbs and serve immediately.

    From Food52.com by Merrill Stubbs, https://food52.com/recipes/24925-chard-salad-with-garlic-breadcrumbs-and-parmesan

    Weeknight Lasagna with Any-Greens Pesto and White Beans

    • For assembling lasagna:
    • 12 lasagna noodles (about 8 ounces), either regular or no-boil
    • 3 cups (roughly) marinara sauce, either homemade or store-bought (from a 24-ounce jar, such as Rao’s)
    • 2 cups (or 16 ounces) full-fat ricotta cheese
    • 1 large egg
    • Kosher salt and freshly ground black pepper
    • 1 3/4 cups cooked white beans (from one 15.5-ounce can), drained and rinsed
    • 2 cups (or 8 ounces) shredded mozzarella
    • For any-greens pesto:
    • 8 ounces greens (one or more of: kale, spinach, Swiss chard, arugula, basil, and parsley)
    • 1/4 cup toasted pine nuts
    • 1 garlic clove
    • 1/3 cup extra-virgin olive oil
    • Finely grated lemon zest + 2 teaspoons juice, from 1 lemon
    • 1/2 cup finely grated Parmesan
    • 1 pinch kosher salt, plus more to taste
    • 1/4 teaspoon red pepper flakes, or to taste

    Preheat the oven to 425°F.

    If using regular lasagna noodles: In a large pan or bowl, cover the noodles in very hot tap water (or cold water warmed in a kettle until about 120°F) seasoned with salt; let the noodles soak for about 10 to 15 minutes while preparing the rest of your ingredients. (Note: a longer soak time may cause the noodles to stick together, so drain and separate them after about 15 minutes). If using no-boil noodles, you can skip this step.

    Lightly oil an 8 by 12-inch baking pan for a thicker lasagna (my preference!), or a 9- by 13-inch pan for a thinner version.

    To make the pesto: In the bowl of a food processor, pulse the greens until finely chopped (adding the greens in batches for them to all fit), then add the pine nuts and garlic. Pulse again until integrated. Stream in the olive oil. Add Parmesan, lemon zest, and lemon juice. Taste, and season to taste with kosher salt. Alternately, make the pesto by hand chopping the greens with a knife. Note: This is a less oily pesto than traditional versions given the volume of greens.

    Transfer pesto to a medium bowl. Stir in ricotta. Taste again and add more salt, if needed, and several grinds of black pepper. (Take the time to get the seasoning right!). Add the egg, and stir until smooth.

    Spread 1 cup pasta sauce in the prepared dish. Arrange 4 slightly overlapping noodles atop the sauce. (Gently tap noodles against the bowl to shake off any water.) Top with roughly one-third of the white beans, then spread roughly one-third of the ricotta-pesto mixture over in an even layer.

    Layer the second row of 4 lasagna noodles, 1 cup sauce, half the remaining white beans, and half the remaining ricotta-pesto mixture.

    Repeat with one more layer of 4 lasagna noodles, 1 cup sauce, and the remaining white beans and ricotta-pesto mixture. Evenly sprinkle the mozzarella over the top.

    Cover lasagna with foil. Bake for 20 minutes. (If using an 8 by 12-inch dish, bake over a sheet pan in case any of the sauce bubbles over.) Uncover, then continue baking until the mozzarella is melted and browned, about 15 to 18 minutes longer. Let stand at least 10 minutes before cutting and serving.

    From Food52.com by EmilyC, https://food52.com/recipes/84985-quick-lasagna-recipe-with-pesto-white-beans

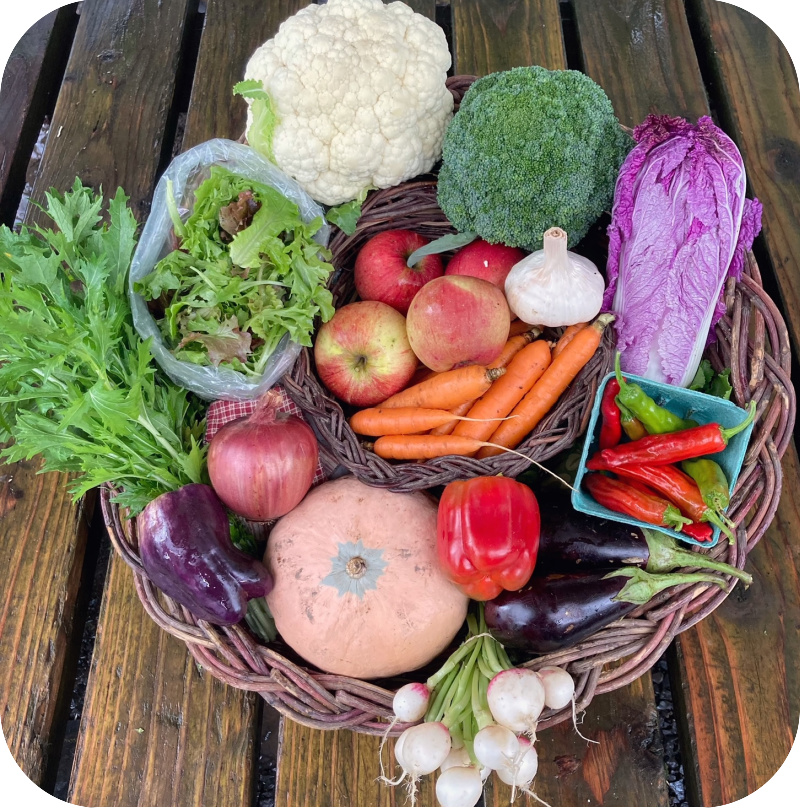
    Summer CSA Share #22

    Welcome to the 22nd share of the Pitchfork & Crow 2022 Summer CSA! Here’s what’s in the share this week:

    • Salad Mix
    • Lacinato Kale
    • Cauliflower or Napa Cabbage
    • Cilantro
    • Diana Radishes
    • LaRatte Fingerling Potatoes
    • Leeks
    • Garlic
    • Delectable” Sweet Corn – This is the last of this season’s sweet corn harvest. It was a good run!
    • Zucchini – Including green zucchini and “Mexicana” zucchini. We’re rapidly approaching the end of summer squash/zucchini season. Enjoy them while you can!
    • Sweet Pepper
    • Thai or Carrot HOT Peppers – Many of our pepper plants didn’t get off to a good start but we wanted to share what we have. Choose from red Thai or orange Bulgarian Carrot peppers. Both are hot.
    • Numex Suave Orange Habanero Pepper – A low heat version of the fruity, usually hot pepper type. Wish we had more to share!
    • Pie Pumpkin
    Farmscapes: Sunrise (top), foggy morning (bottom left), and flying geese (can you see them?) (bottom right).

    Hey, we finally got some measurable rain! The seasonal shift hit this week and it was just blustery and wet enough to feel like fall but there were still some sunny moments too, so we don’t quite have seasonal whiplash. We’re easing into mud season. Hurrah for the rain!

    As a reminder, the Summer CSA season has four weeks left and then we’ll be taking a two week break before the start of the Winter CSA season for those of you intrepid eaters that were able and willing to jump on board. That’s to say, the end will be here before we know it. As the days continue to get shorter and the weather actually feels like fall, it’s become obvious it’s time to think about eating in the winter months ahead.

    For anyone looking to purchase extra winter staples we suggest checking out one of the Fill Your Pantry events happening around the state in the coming month. These are single day markets, some with pre-ordering still available, where you can purchase varying quantities of locally grown produce and other staples like meats, honey, grains, and beans. Although it will require heading to Corvallis, Eugene, or Bend, you’ll be able to fill your winter pantry in a single trip. Check out the event pages below depending on which location suits your needs best.

    Harvest Day Scenes: In the kale (top), in the radishes (bottom left), and in the leeks (bottom right).

    We’re continuing to fill our own pantry here on the farm. Or rather fill all the storage spaces we can come up with. This past week we began the sweet potato digging and the temperature controlled room we use as a seed germinating chamber has shifted to use as sweet potato curing chamber. We also managed to thresh and winnow the dry beans and they’re ready for future CSA shares. We also got our 2023 garlic crop in the ground as well as our overwintering onions. Slow and steady progress.

    In the week ahead we’ll continue the potato and sweet potato harvests, do a little weeding in a couple of greenhouse spaces, get some cover crop seed in the ground, and generally try to stay ahead of any cold snaps that may be headed our way any time now. Four more weeks until the end of the Summer CSA season!

    Enjoy the vegetables and we’ll see you here next week!

    Your farmers,
    Carri Heisler & Jeff Bramlett

    .

    Here are a few recipes to get you inspired:

    Triple Surprise Kale Salad

    • 1 small Sugar Pie pumpkin (about 3 to 3 1/2 pounds)
    • 1 1/2 tablespoons extra-virgin olive oil, plus more for drizzling the pumpkin
    • Freshly ground black pepper
    • 4 long slices (about 5 ounces) of thick bacon, cut into big bite-size squares
    • About 1 1/2 teaspoons of brown sugar, divided
    • A pinch of cinnamon (about 1/4 teaspoon)
    • A pinch of cayenne pepper (about 1/4 teaspoon)
    • 1/2 cup (about 3 ounces) blanched almonds, cut into quarters
    • 1 teaspoon coarse sea salt
    • 12 ounces kale
    • 1 tablespoon cider vinegar

    Preheat the oven to 400° F. Chop the pumpkin in half and remove the seeds. Cut the pumpkin into slices, remove the skin, and then cut the flesh into 3/4-inch cubes. Drizzle the cubes with a little olive oil, season with black pepper, and toss to combine. Place the cubes on a baking sheet lined with parchment paper and bake for about 30 minutes, until nicely caramelized and soft (but not soft enough that the pumpkin is falling apart). Remove the pumpkin from the oven and let it cool. (You will not have to use all of the pumpkin cubes for this dish — probably only about half — but they are a good leftover to have.)

    Decrease the oven temperature to 325° F. Line another baking sheet with parchment paper and arrange the bacon slices on the sheet in a single layer. Sprinkle the bacon with about 1/2 teaspoon of the brown sugar, the cinnamon, and the cayenne. Bake for about 25 to 30 minutes, or until the bacon is caramelized and very crispy, and all of the fat has rendered out. Let the bacon cool completely and then cut it into 3/4-inch pieces. (The bacon will crisp more as it cools.)

    Heat a cast iron skillet over medium heat. Reduce the heat to medium-low, add the almonds, and toast them for about 8 to 10 minutes, until lightly golden. Stir frequently to make sure that the almonds do not burn. Remove the almonds from the skillet and add the remaining 1 teaspoon of brown sugar to the skillet. When the sugar melts, return the almonds to the skillet, mix them with caramelized sugar, and sprinkle with one teaspoon of coarse sea salt. Remove the skillet from the heat, pour the almonds onto a plate, and let them cool completely. Brush any remaining salt in the skillet onto the almonds.

    Wash the kale and dry it thoroughly. Remove the hard steams and chop the kale into 3/4-inch strips. Heat a cast iron skillet or casserole dish over medium heat. Place the kale into the skillet and “dry-sauté” over medium heat for about 5 to 7 minutes, stirring constantly. Resist the temptation to add any water to the skillet. Remove from the heat when the kale begins to soften. Let the kale cool completely.

    Prepare the vinaigrette: In a small bowl, mix together the olive oil and cider vinegar and season with freshly ground black pepper. Whisk until well blended and creamy.

    In a large bowl toss the kale with the vinaigrette. Arrange the kale on a large platter and top with the pumpkin cubes and bacon. Sprinkle with the sea salt-almond crust and serve.

    From Food52.com by QueenSashy, https://food52.com/recipes/31255-triple-surprise-kale-salad

    3-Ingredient Potato Leek Soup

    • 2 tablespoons olive oil or butter
    • 4 leeks
    • 1 1/4 pounds potatoes (I prefer Yukon gold)
    • 6 cups water
    • salt, to taste

    Clean the leeks carefully, then slice them into thin half-moons. Scrub and dice the potatoes into small cubes.

    In a large pot or Dutch oven, heat the oil over medium-high heat. Add the sliced leeks and season with salt and pepper. Cook for about 5 minutes, stirring occasionally, until the leeks soften.

    Add the potatoes and the water. Reduce the heat to medium-low, cover, and cook for 15-30 minutes: The soup is ready when the potatoes can be easily poked with a fork. The timing will vary depending on the type of potatoes you use.

    Using an immersion blender, puree the soup until smooth. (If you don’t have one, transfer the soup to a blender and blend until smooth. Be very careful with the hot liquid!) Taste the soup and season with more salt if needed.

    From Food52.com by Posie (Harwood) Brien, https://food52.com/recipes/74363-3-ingredient-potato-leek-soup

    Harissa Chicken with Leeks, Potatoes, and Yogurt

    • 1 1/2 pounds bone-in, skin-on chicken thighs and drumsticks
    • 1 1/4 pounds Yukon Gold potatoes, peeled and cut into 1 by 1/2-inch chunks
    • 3 teaspoons kosher salt
    • 3/4 teaspoon freshly ground black pepper
    • 2 tablespoons harissa
    • 1/2 teaspoon ground cumin
    • 4 1/2 tablespoons extra-virgin olive oil, plus more as needed
    • 2 leeks, white and light green parts, halved lengthwise, rinsed, and thinly sliced into half-moons
    • 1/2 teaspoon grated lemon zest
    • 1/3 cup plain yogurt, preferably whole-milk (if using Greek, thin it down with a little milk to make it drizzle-able
    • 1 small garlic clover
    • 1 cup mixed soft fresh herbs such as dill, parsley, mint, and/or cilantro leaves
    • 1 splash fresh lemon juice, as needed

    Combine the chicken and potatoes in a large bowl. Season them with 2½ teaspoons of the salt and ½ teaspoon of the pepper. In a small bowl, whisk together the harissa, cumin, and 3 tablespoons of the olive oil. Pour this mixture over the chicken and potatoes, and toss to combine. Let it stand at room temperature for 30 minutes.

    Meanwhile, in a medium bowl, combine the leeks, lemon zest, ¼ teaspoon of the salt, and the remaining 1½ tablespoons olive oil.

    Heat the oven to 425°F.

    Arrange the chicken and potatoes in a single layer on a large rimmed baking sheet, and roast for 20 minutes. Then toss the potatoes lightly, and scatter the leeks over the baking sheet. Roast until the chicken is cooked through and everything is golden and slightly crisped, 20 to 25 minutes longer.

    While the chicken cooks, place the yogurt in a small bowl. Grate the garlic clove over the yogurt, and season with the remaining ¼ teaspoon salt and ¼ teaspoon pepper.

    Spoon the yogurt over the chicken and vegetables in the baking sheet (or you can transfer everything to a platter if you want to be fancy about it). Scatter the herbs over the yogurt, drizzle some olive oil and lemon juice over the top, and serve.

    From Food52.com by Melissa Clark, https://food52.com/recipes/68405-harissa-chicken-with-leeks-potatoes-and-yogurt

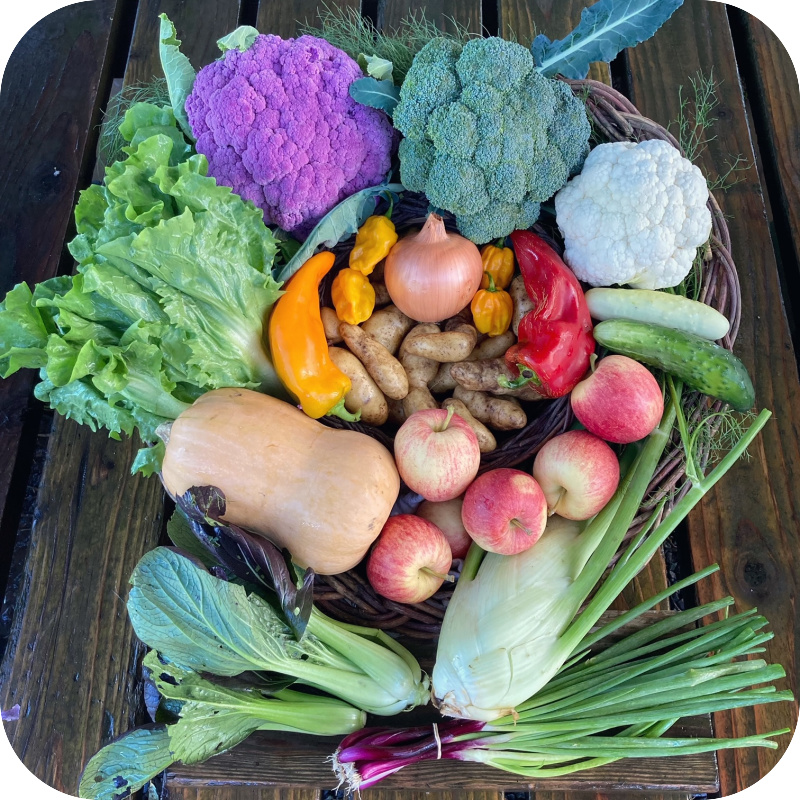
    Summer CSA Share #21

    Welcome to the 21st share of the Pitchfork & Crow 2022 Summer CSA! Here’s what’s in the share this week:

    • Spinach
    • Purple Napa Cabbage
    • Cauliflower
    • Parsley
    • Celery
    • Carrots
    • LaRatte Fingerling Potatoes
    • Red Bunching Onions
    • Delectable” Sweet Corn
    • Zucchini – Including green zucchini and “Mexicana” zucchini. We’re rapidly approaching the end of summer squash/zucchini season. Enjoy them while you can!
    • Sweet and Shishito Peppers – The shishitos are the roulette peppers we’ve shared in the past where 1 in 10 can be hot. They’re delicious blistered in hot oil and salted as a snack or chopped up and thrown into other dishes. We’ve enjoyed them in breakfast burritos.
    • Mixed Tomatoes – The tomatoes are dwindling but we might be able to eek one more week out of them. Time will tell.
    October farm photos from a drone flight this week. Looking east (top), winter kale (bottom left), looking west (bottom right).

    After an extended summer stretch it looks like we’ve finally got some fall rain in the forecast later this week and into next week. Hurrah for that! Have we mentioned we’re looking forward to the end of irrigation season? Last weekend’s high of 90 here at the farm was a little much for October if you ask us. We’ve been slowly but surely working through the list of things that need to be done before the mud returns and fingers crossed we’ll be ready by the time the rain hits Friday evening.

    Bunching onion harvest.

    This time of year I begin looking closer at the various weather forecasts. Mid-October brings with it the threat of the first frost and this time of year we’re always planning as if it could be right around the corner. That first frost warning signals the end of many summer crops and a shift in what’s available to harvest from the field. Staying on top of the short and long range weather forecasts can help when deciding what projects to tackle next.

    For daily and 10 day forecasts I’ve found the Weather Underground app to be fairly reliable for our location. It provides detailed info about when to expect rain and elevated wind throughout the day and tends to be accurate with temperature predictions. Our weather station is also linked to the Weather Underground network and glancing at the real time temps reflect what’s happening here on the farm. You can see the farm weather station here.

    Longer range forecasts are of course less accurate and more susceptible to change as the dates get closer, but it’s nice to have a heads up about the possibilities that models are showing. I like to read what Rufus at the Weather Cafe has to say for forecasts that are within a few weeks. He focuses on the PNW in twice a week updates and discusses the possibilities of what might be headed our way with the caveat that models often change.

    The other long range forecast I’ve found to be helpful is the seasonal climate forecast put together jointly by the Oregon Department of Agriculture and the Oregon Department of Forestry. It’s updated monthly with temperature and precipitation projections for the next three month period. These forecasts are based on historical data in years that resemble the current weather patterns. The historical years used for comparison are revised from time to time as current weather data change. This is an especially intriguing discussion as climate change factors are evaluated.

    Garlic seed (top) and potato harvesting (bottom).

    With an eye on the rain in the forecast we spent this past week preparing for the shift in weather. We finished bringing in the flour corn to dry down in the prop house and we harvested the dry bean plants too. They’re drying down in the old prop house and we’ll thresh out the beans once the plants are dry enough. In the meantime we shifted focus to potato harvest and managed to get three more beds harvested and into storage. Hopefully we have another window after the initial bout of rain this week so we’re not finishing up that project in too much mud.

    After cracking our garlic seed this past weekend we’re ready to get our 2023 garlic crop in the ground on Thursday ahead of the rain. We’ll also be planting out overwintering onions and fava beans if we’re quick enough. These mark the last of the crops to be planted outside in the field this season. Fingers crossed the rain holds off just long enough for us to finish up.

    Enjoy the vegetables and we’ll see you here next week!

    Your farmers,
    Carri Heisler & Jeff Bramlett

    .

    Here are a few recipes to get you inspired:

    Sheet Pan Curried Chicken with Cauliflower and Grapes

    • For chicken and curry rub:
    • 6 chicken thighs, bone-in and skin-on (about 2.5 pounds total)
    • 2 tablespoons full-fat yogurt (either regular or Greek)
    • 2 tablespoons olive oil
    • 4 teaspoons curry powder (salt-free), such as madras or maharajah
    • 2 teaspoons kosher salt
    • For rest of sheet pan and yogurt sauce:
    • 1 teaspoon curry powder (salt-free), such as madras or maharajah
    • 1 tablespoon olive oil, plus more for yogurt sauce
    • 1 head of cauliflower, cut into small florets
    • 1 cup red or black seedless grapes, left whole if small, or halved if large
    • 1 tablespoon fresh thyme leaves, roughly chopped
    • 1/2 teaspoon kosher salt
    • 1/4 teaspoon freshly ground black pepper
    • 1 cup full-fat yogurt (regular or Greek)
    • 1 large lemon
    • A few big handfuls of roughly chopped cilantro, parsley, or dill
    1. Heat oven to 425° F.
    2. Dry chicken well with paper towels. Make curry rub by whisking together yogurt, olive oil, curry powder, and salt until well integrated (it may not fully emulsify, which is fine). Notes: you may need to add a bit more olive oil if using Greek yogurt. If using a curry powder that includes salt, slightly decrease the amount of kosher salt in the rub.
    3. Season chicken evenly with the curry rub (on both sides and under the skin). Arrange in a single, even layer on a sheet pan.
    4. Roast chicken for 15 minutes. (Set a timer.)
    5. Meanwhile, in a large bowl, mix together 1 teaspoon curry powder with 1 tablespoon olive oil. Add cauliflower, grapes, thyme, 1/2 teaspoon salt, and 1/4 teaspoon black pepper to taste. Toss well to evenly coat in the curry oil.
    6. When the timer goes off, remove the sheet pan from the oven, and add the cauliflower and grape mixture, nestling it around the chicken as evenly as possible. Roast about 20 minutes longer, or until the chicken is cooked through (target temperature is 165° F in the thickest parts) and cauliflower is tender. (Note: If the chicken is done before the cauliflower, remove it from sheet pan and continue roasting the cauliflower. Optional: slide the pan under the broiler for a few minutes to deepen the browning of the chicken and cauliflower.) Squeeze the juice from half a lemon over the chicken and cauliflower. Adjust acidity and seasoning to taste. Toss in herbs.
    7. While the chicken cooks, combine yogurt, 1 tablespoon lemon juice, and a big pinch or two of salt. Stir to combine, and adjust acidity and seasoning, to taste. Drizzle a little olive oil over the top.
    8. Serve warm with yogurt on the side, so everyone can spoon some onto their plates.

    From Food52.com by EmilyC, https://food52.com/recipes/78524-sheet-pan-curried-chicken-with-cauliflower-and-grapes

    Chicken Stew with Potatoes, Carrots, and Celery

    • 3 tablespoons extra-virgin olive oil
    • 2 pounds skinless boneless chicken thighs
    • 1 medium white onion, finely chopped
    • 4 garlic cloves, finely chopped
    • Kosher salt
    • 1 sprig rosemary
    • 1 sprig thyme
    • 3 medium carrots, peeled and cut into 1-inch pieces
    • 3 ribs celery, cut into 1-inch pieces
    • 1/4 cup all-purpose flour
    • 32 ounces low-sodium homemade or store-bought chicken stock
    • 1 pound Yukon gold potatoes, cut into bite-size pieces
    • 1/2 teaspoon freshly ground black pepper
    • Chopped parsley, for garnish

    In a large heavy-bottomed pot over medium-high heat, heat the oil. Sear the chicken for about 3 minutes on each side, until browned. Transfer to a cutting board and cut the chicken into bite-size pieces. Set aside.

    In the same pot over medium heat, cook the onion and garlic, stirring, for about 3 minutes, until translucent and softened; season with salt. Add the rosemary and thyme and cook, stirring occasionally, for about 2 minutes, until fragrant. Add the carrots and celery and cook, stirring occasionally, for about 8 minutes, until translucent.

    Add the flour and cook, stirring constantly, for about 3 minutes, until all of the vegetables are coated and the raw taste has cooked off. Slowly pour in the stock, stirring to break up any lumps of flour.

    Add the chicken, potatoes, and pepper and stir to combine. Bring to a boil, then reduce the heat to medium-low and simmer for about 20 minutes, until the chicken and potatoes are fully cooked and the liquid has slightly thickened. Taste and adjust the seasonings; discard the thyme and rosemary sprigs.

    Divide the soup among bowls. Garnish with the parsley.

    From Food52.com by Rachel Gurjar, https://food52.com/recipes/84569-best-chicken-stew-recipe

    Napa Cabbage with Hot Bacon Dressing

    • 1 Napa cabbage, halved lengthwise and thinly sliced (you’ll need 6 to 8 cups)
    • 8 thick slices bacon, cut into 1/ 4-inch lardons
    • 1 tablespoon flour
    • 2 tablespoons red wine or cider vinegar
    • 1/2 cup plus 2 tablespoons water
    • 3/4 teaspoon salt
    • 1 egg, lightly beaten

    Place the cabbage in a large mixing bowl. Add the bacon to a medium sauté pan and set over medium heat. Render the bacon fat and brown the bacon, adjusting the heat as needed. Remove the bacon with a slotted spoon to a plate lined with paper towel, then pour off all but 2 tablespoons bacon fat (approximate, don’t measure) from the pan.

    Set the pan over medium low heat. Add the flour and stir until smooth. Cook for 1 minute. Stir in the vinegar and water and bring to a boil. Season with the salt. Gradually – and slowly! – whisk this mixture into the egg.

    Sprinkle the bacon on the cabbage, then pour 3/4 of the dressing over the cabbage and toss to mix. Add more dressing as desired (I like a fair amount). Serve with grilled pork chops, roasted potatoes and beer.

    From Food52.com by Amanda Hesser, https://food52.com/recipes/7940-helen-getz-s-napa-cabbage-with-hot-bacon-dressing

    Parsley Miso Pesto

    • 2 heaping cups fresh parsley (about 3/4 of a bunch)
    • 2 garlic cloves, sliced, plus more to taste
    • 4 teaspoons white miso, plus more to taste
    • 5 tablespoons extra virgin olive oil, plus more as needed to moisten and bind the pesto

    Knife method: Pile about a third of the parsley and garlic in the center of a large cutting board, and use a large, sharp chef’s knife or vegetable cleaver to chop it very fine. Add another third of the parsley and garlic, and chop again until very fine. Add the final third of the parsley and garlic, and chop again until very fine. Add the miso paste, 1 teaspoon at a time, chopping each addition into the mixture until it’s incorporated. Towards the end, you may find it easier to mash the miso into the herbs with the flat of your knife, rather than chopping. The pesto is ready when you can press it into a lump and have it more or less stick to itself.

    Food processor method: In a food processor, combine parsley, garlic, and miso paste. Pulse until the mixture is finely chopped and holds together when pressed. (If you have a small processor, doing this in batches is fine.)

    If you’re using immediately, combine the parsley mixture with the oil. If you did the knife method, you can do this by hand in a bowl. If you used a food processor, you can stream in the oil with the machine running.

    If you aren’t using immediately, you can simply pour the oil over the herbs. The unstirred pesto can be covered with plastic wrap and refrigerated for 2 to 3 days. To freeze the pesto, transfer the solids to an airtight container and add enough olive oil to cover the surface; it’ll keep in the freezer for up to 2 months. Thaw frozen pesto overnight in the refrigerator. Just before serving, stir to combine the olive oil and solids.

    From Food52.com by IEatThePeach, https://food52.com/recipes/24851-parsley-miso-pesto

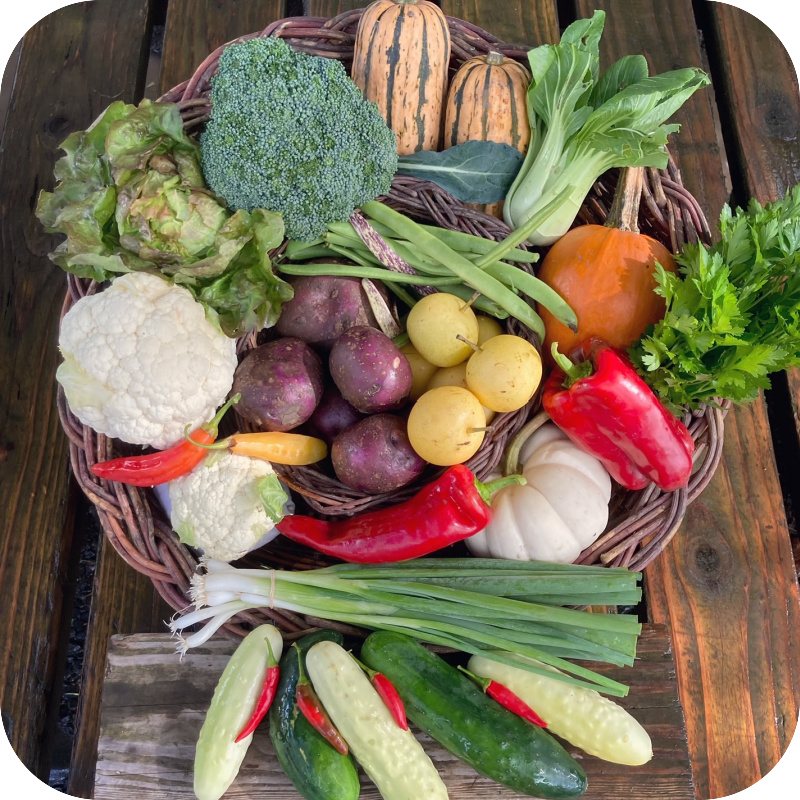
    Summer CSA Share #20

    Welcome to the 20th share of the Pitchfork & Crow 2022 Summer CSA! Here’s what’s in the share this week:

    • Lettuce Mix
    • Spinach
    • Broccoli
    • Cauliflower
    • Italian or Thai Basil
    • Carrots!
    • Red Onion
    • Garlic
    • Sweetness” Sweet Corn
    • Zucchini – Including green zucchini and “Mexicana” zucchini. We’re rapidly approaching the end of summer squash/zucchini season. Enjoy them while you can!
    • Mixed Cucumbers – Including green cukes, ‘Silver Slicer’ yellow cukes, and lemon cukes. Cucumbers are on the way out!
    • Mixed Sweet Peppers
    • Aji Marchant Hot Peppers – These peppers have an intriguing history that you can read about here. Though spicy when yellow and under-ripe they get hotter as they mature to red.
    • Mixed Cherry Tomatoes
    • Slicer Tomato
    • Mixed Eggplant
    Sunrise from our living room window (top left), sunchokes flowering (top right), frog in the flour corn (bottom left), and mostly empty prop house with drying flour corn (bottom right).

    Jeff mentioned yesterday that it felt like the months were off this season. June felt like May, October feels like September. We’re thankful for the extended weather window while we attempt to get the remaining storage crops out of the field. We’re kind of over the 80 degree days though and would welcome shift to the 60s or 70s. Can we stop irrigating please?

    We did get all of the flour corn harvested and now it’s drying down in the prop house. The onions that were drying down there are now boxed and being stored in the germ chamber where we can regulate the temperature until we’re ready to use them. Luckily we’re done using the germ chamber for germinating seeds for the moment. It’s nice to be able to use these spaces for multiple uses throughout the season, even if it takes some planning ahead.

    The only photos I managed from the pumpkin patch…

    Many thanks to everyone who made it out to the farm this past Saturday. Tractor rides were taken, farm tours happened, and pumpkins were picked from the patch. It was great to be able to show many of you around the farm and get to chat about what’s going on out here. If you missed the event but want to take a walk around the farm just let us know. We’d love to show you around. Also, we’ll have extra carving pumpkins at both pick-ups for anyone that needs more pumpkins.

    Spinach, corn, and cauliflower on harvest day.

    As we begin to think about wrapping this CSA season up we know there’s still a lot to do before we make it to the end. With six weeks remaining in the summer season, and an expectation that the rain and/or frost will make an appearance sooner or later, it’s time to squeeze as much as we can from this growing season.

    Our seed garlic arrived this past weekend and soon I’ll be cracking open the heads, getting ready to plant next year’s garlic crop. We’re also about to get serious about harvesting potatoes, sweet potatoes, and dry beans. One step at a time. Eventually we’ll get through these big harvests, hopefully before it starts to rain too much. In the meantime summer shares will start to look more like fall shares soon as we get into leek and kale weather soon.

    Harvest day sunset.

    Enjoy the extended summer via extended summer crops! Happy eating this week!

    Enjoy the vegetables and we’ll see you here next week!

    Your farmers,
    Carri Heisler & Jeff Bramlett

    .

    Here are a few recipes to get you inspired:

    Curried Cauliflower Soup

    • 1 head cauliflower (about 2 1/4 pounds), cut into florets, or about 6 cups)
    • 2 tablespoons vegetable oil
    • 1 teaspoon salt
    • 1 tablespoon butter
    • 3 onions, sliced 1-inch thick
    • 1/2 teaspoon turmeric
    • 1/2 teaspoon dried coriander
    • 1/2 teaspoon hot paprika or chili powder
    • 1 teaspoon cumin
    • 4 cups water
    • 2 cups chicken or vegetable broth
    • 1 cup yogurt or labnne (optional; adjust to suit tastes)

    Preheat oven to 450° F. On a baking sheet, toss cauliflower with vegetable oil and 1 teaspoon salt. Spread out and roast until the florets turn brown, about 25 minutes. Set aside 1/2 cup of the crispiest florets for garnish.

    Melt butter in a pot over medium-high heat. Add onions and cook until soft, about 5 minutes. Stir in spices, cauliflower, water, and broth; cover, and bring to a boil. Uncover, lower heat, and simmer 5 minutes.

    Using an immersion blender, blend the soup until a desired consistency is reached. Stir in yogurt or labne if using. Season with salt and pepper and serve in bowls, garnishing with the reserved cauliflower florets.

    From Food52.com by KMartinelli, https://food52.com/recipes/11855-curried-cauliflower-soup

    Unfussy Eggplant Parm

    • 1/4 cup olive oil, plus more for drizzling
    • 1 (28-ounce) can whole, peeled tomatoes
    • 1 teaspoon kosher salt, plus more for sprinkling
    • 1 medium globe eggplant
    • 1/2 cup fresh breadcrumbs
    • 1/4 cup grated low-moisture, whole-milk mozzarella
    • 2 tablespoons grated parmesan

    Get the tomato sauce going. Add the olive oil to a pot and set over medium heat. When it’s shimmery, add the tomatoes and their juices. Smush with a spoon to break up a bit. Add the salt and stir. Cook—somewhere between a simmer and boil, stirring every so often—for about 30 minutes, or until thick and jammy.

    Preheat the oven to 400° F.

    Cut the eggplant in half lengthwise—so, from stem to tush. Now, cut a diagonal crosshatch pattern in each: sort of like a duck breast. Figure 1/2-inch deep, 3/4-inch diamonds. Line a rimmed sheet tray with parchment or foil or a silicone mat. Place the eggplant haves on top, cut side facing up. Drizzle with olive oil and sprinkle with salt. Rub both into the eggplant with your hands.

    Roast for about 28 minutes or until tender. During the last couple minutes, add the breadcrumbs to the sheet pan to toast a little. Pull from the oven and raise the temperature to 475° F. Mix the mozzarella and parm in a small bowl to combine. Top each eggplant half with 6 tablespoons tomato sauce, spreading evenly with a spoon. Now top each with roughly a quarter of the cheese. Then each with half the breadcrumbs. Finish with the remaining cheese.

    Bake until the cheese is bubbly and browned, about 4 minutes.

    Let cool a little before serving. Serve with a fork and very sharp, steak-worthy knife.

    From Food52.com by Emma Laperruque, https://food52.com/recipes/77386-unfussy-eggplant-parm

    Genius Ratatouille From Alice Waters

    • 1 medium or 2 small eggplant, cut into 1/2-inch dice
    • 4 tablespoons olive oil, divided, plus more to taste
    • 2 medium onions, cut into 1/2-inch dice
    • 4 to 6 garlic cloves, chopped
    • 1/2 bunch basil, tied in a bouquet with kitchen twine + 6 basil leaves, chopped
    • 1 pinch dried chile flakes
    • 2 sweet peppers, cut into 1/2-inch dice
    • 3 medium summer squash, cut into 1/2-inch dice
    • 3 ripe medium tomatoes, cut into 1/2-inch dice
    • Salt to taste

    Toss the eggplant cubes with a teaspoon or so of salt. Set the cubes in a colander to drain for about 20 minutes.

    Heat 2 tablespoons of olive oil in a heavy-bottomed pot. Pat the eggplant dry, add to the pan, and cook over medium heat, stirring frequently, until golden. Add a bit more oil if the eggplant absorbs all the oil and sticks to the bottom of the pan. Remove the eggplant when done and set aside.

    In the same pot, pour in 2 more tablespoons olive oil. Add onions and cook for about 7 minutes, or until soft and translucent. Add the garlic, basil bouquet, dried chile flakes, and a bit more salt.

    Cook for 2 or 3 minutes, then stir in peppers. Cook for a few more minutes, then stir in summer squash. Cook for a few more minutes, then stir in tomatoes.

    Cook for 10 minutes longer, then stir in eggplant and cook for 10 to 15 minutes more, until all the vegetables are soft. Remove the bouquet of basil, pressing on it to extract all its flavors, and adjust the seasoning with salt.

    Stir in the chopped basil leaves and more extra virgin olive oil, to taste. Serve warm or cold.

    From Food52.com by Genius Recipes, https://food52.com/recipes/14155-alice-waters-ratatouille

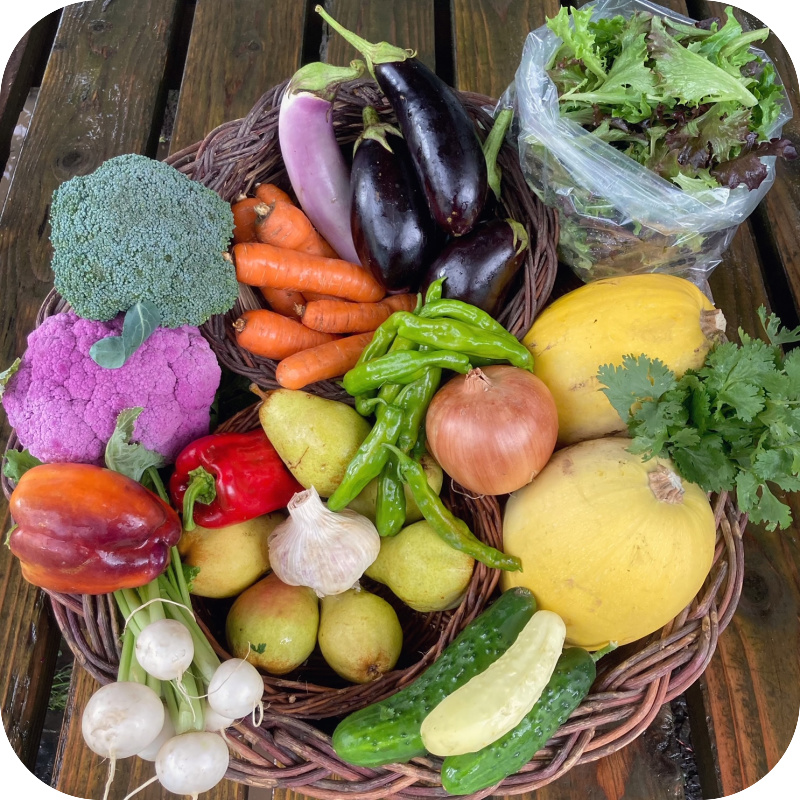
    Summer CSA Share #19

    Welcome to the 19th share of the Pitchfork & Crow 2022 Summer CSA! Here’s what’s in the share this week:

    • Lettuce Mix
    • Broccoli
    • Cauliflower
    • Italian Basil
    • Strawberry Paw or LaRatte Fingerling Potatoes
    • Onion
    • Garlic
    • Sweetness” Sweet Corn
    • Zucchini & Summer Squash – Including green zucchini, yellow summer squash, and “Mexicana” zucchini. We’re rapidly approaching the end of summer squash/zucchini season. Enjoy them while you can!
    • Mixed Cucumbers – Including green cukes, ‘Silver Slicer’ yellow cukes, and lemon cukes. Cucumbers are on the way out!
    • Poblano & Jalapeno Peppers
    • Mixed Cherry Tomatoes
    • Mixed Slicer Tomato
    • Tomatillos – A little like green tomatoes, tomatillos make excellent salsa verde and enchilada sauce. Check out this website for more details and recipes.
    • Melon – Choose from Tuscan, Lambkin (aka Christmas), Honey Orange honeydew, and some watermelons.
    The pumpkins are ready for the big day!

    Hello October! We’re welcoming the shorter days, foggy mornings, and pumpkins! We’re both suckers for a good pumpkin. The recent temps could be a little lower, just saying, but the heat doesn’t linger like it does in August so we’ll take it. Though we need some rain, and we’ll appreciate it when it finally arrives, the extended sunshine has helped offset the rough start to the season back in June.

    It looks like the good weather is going to hold through this coming Saturday and the annual CSA member pumpkin patch farm visit. We invite all CSA members out to the farm to grab some pumpkins, take a walk around the farm, and maybe even hop onboard for a tractor ride. You can find the details in your weekly member email.

    Harvest day!

    Shorter days mean more strategic harvesting. We’ve been beginning the weekly harvest on Sundays to make sure we get through the list of items appearing in your shares. But Mondays are still the biggest harvest days when we focus on bringing in the bulk of the vegetables. We start with greens, to get them into the cooler before the heat of the day strikes, and then move through the list generally from most time consuming to least time consuming. Sometimes we’ll knock off an item of unsure quantity to make sure we can mitigate the results. For example: Not enough cauliflower for everyone? We’ve got extra broccoli and can make it a choice scenario. We keep at it through the day and often we find ourselves harvesting corn as the sun is fading.

    Harvest day tools include clean harvest bins, sharp knives, and tally counters we use to count most items. If you get to choose from a bin of cucumbers or broccoli or bunches of basil at the pick-up, they’ve been counted in the field and again after washing to make sure the correct number makes it to each pick-up location. Anything you receive bagged is generally weighed in the field then the bags are counted as the item is bagged. This is how we make sure there’s enough of everything but also don’t harvest more than we’ll need each week.

    There’s a lot going on here at the farm that doesn’t involve counting vegetables too. Of course we keep busy growing the vegetables, but there are lots of other critters going about their own business. Over the past few weeks we’ve seen a family of quail seemingly using the farm to hunker down for hunting season, hawks swooping through hunting rodents, and lots of deer and turkeys enjoying the salad bar that is the farm. There are all the types of bees (and wasps and hornets), so many tree frogs that show up in unsuspecting places (like the pumpkin leaf in the photo above), and yesterday we saw a hummingbird drinking from a flowering tobacco plant. Noticing all of these other creatures is a bonus to the farmwork day after day. That’s just to say that it’s not all counting vegetables here on the farm.

    This past week we managed to get the last greenhouse planted to lettuce, cilantro, dill, and bok choy plus some direct sown kale and tatsoi for late fall and winter harvests. It’s a relief to have the majority of the planting out of the way. Soon we’ll be getting the garlic and overwintering onions in the ground and wrapping up the planting season for the year.

    This week we’ll be focused on getting things ready for the CSA farm event on Saturday. We’ll make sure the tractor is ready to pull and the trailer is ready to roll. We’ll also get the farm map updated and signs posted for the self-guided tour. And as usual, there’s plenty of mowing, cultivating, and potato, dry bean, and flour corn harvesting to get done as well.

    Enjoy the vegetables and we’ll see you here next week!

    Your farmers,
    Carri Heisler & Jeff Bramlett

    .

    Here are a few recipes to get you inspired:

    Mexican Corn Pudding Served With Smoky Chipotle Sauce

    • Butter for greasing the dish
    • 1/4 cup plain breadcrumbs to coat the bottom of the dish
    • 8 medium-sized ears of corn, kernels removed from the cob
    • 1 cup butter, cut into small pieces
    • 1/2 cup whole milk
    • 6 large eggs
    • 4 ounces queso fresco
    • 1 teaspoon baking powder
    • 2 tablespoons flour
    • 1/4 cup sugar
    • 1 (4 1/2 ounce) can chopped green chiles, drained
    • FOR THE SAUCE:
    • 3 peeled cloves garlic
    • 4 medium tomatillos, husked, rinsed and cut in half
    • 2 canned chipotle chiles en adobo
    • salt to taste

    PREP: Preheat the oven to 350. Butter a 9 x 13 inch baking dish and then cover the bottom with an even layer of bread crumbs. With a sharp knife, cut the corn off of the cobs into a large bowl (or the bowl of a food processor if you have one).

    COMBINE: Add remaining ingredients to the corn and stir to combine. If you are using a food processor, pulse until mixture is smooth. If you do not have a food processor, puree the mixture in batches in a blender until smooth.

    COOK: Pour the corn mixture into the baking pan and bake 1 hour.

    WHILE CORN PUDDING COOKS, MAKE THE SAUCE: Lay garlic and tomatillos (cut-side down) in a non-stick skillet and saute over MEDIUM HIGH heat until tomatillos are brown, about 4 minutes. Turn over and brown the other side. Transfer everything to a blender. Add chiles + 1/4 cup water and blend until coarse. Season with salt to taste. Pour into a serving bowl and serve at room temperature.

    SERVE: Serve corn pudding warm with smoky chipotle sauce drizzled to taste. It is nice and hot, so start off with just a little.

    From Food52.com by Waverly, https://food52.com/recipes/6322-mexican-corn-pudding-served-with-smoky-chipotle-sauce

    Cauliflower Pizza Bake

    • 1/2 pound (about 2 links) uncooked Italian sausage, removed from casings and cut into 1/2-inch pieces
    • 2 tablespoons olive oil, divided
    • 1 large head of cauliflower, trimmed and cut into small, bite-sized florets
    • 1/2 cup pizza sauce, divided
    • 1/4 cup finely grated parmesan, plus more for finishing dish
    • Kosher salt + freshly ground black pepper, to taste
    • 1/4 cup black olives (I like to use the sliced, canned kind)
    • 1/4 cup slivered or halved sun-dried tomatoes packed in olive oil (drained of oil before using)
    • 2 to 3 ounces pepperoni
    • 4 ounces fresh mozzarella (sold in rounds or logs), torn into bite-sized pieces
    • A big handful of fresh basil leaves, torn

    Heat oven to 425 F. Place a parchment-lined sheet pan in the oven while it heats. The hot pan will help the sausage to get nicely browned, fast!

    Working quickly, transfer the sausage to the preheated sheet pan in a single, even layer. (Careful, the pan will be hot!) Drizzle the sausage with 1 tablespoon of olive oil. Roast for about 6 to 8 minutes, or until the sausage is starting to brown (set a timer).

    Meanwhile, in a large bowl, combine cauliflower florets with 1/4 cup pizza sauce, 1/4 cup grated parmesan, and 1 tablespoon olive oil. Season to taste with salt and pepper, and toss. You want the pizza sauce to lightly yet thoroughly coat the florets; add another tablespoon of sauce, if needed. Add olives and sun-dried tomatoes to the bowl and toss again.

    When the timer for the sausage goes off, add the cauliflower mixture to the sheet pan, stirring a few times to coat the cauliflower in the sausage fat. Arrange pepperoni evenly across the top.

    Roast for 15 more minutes, until the cauliflower is crisp-tender and the pepperoni has browned. (Taste a piece of cauliflower; if it isn’t approaching tender, return to the oven for a few more minutes before proceeding to Step 6. Season with a little more salt and pepper, if needed.)

    Remove sheet pan from oven, and spoon 1/4 cup more sauce over the cauliflower mixture; add a little extra, if desired, for a saucier version. Arrange bites of torn mozzarella over (and in between) the cauliflower florets (avoid putting it directly on the bottom of the sheet pan). Roast in the oven for another 5 minutes, or until the sauce is warmed and cheese is melted.

    Cool for about 5 minutes, then grate more parmesan on top and scatter the basil. Serve warm.

    From Food52.com by EmilyC, https://food52.com/recipes/81160-cauliflower-pizza-bake

    Cantaloupe & Cucumber Salad with Basil & Feta

    • 1/2 of a medium cantaloupe, cut into 1/2-inch chunks
    • 1 cucumber, cut into 1/2-inch chunks (any variety will do, but I prefer a hothouse — seedless, with a thinner skin — for this salad)
    • 6 large basil leaves, chiffonaded (see note)
    • 3 ounces feta, crumbled
    • 3 tablespoons shelled raw sunflower seeds
    • Olive oil
    • Balsamic vinegar
    • Flaky sea salt
    • Ground pepper

    To toast the sunflower seeds, place in a dry pan over medium heat. Toast 2 to 3 minutes, shaking the pan occasionally, until lightly browned and fragrant.

    In a bowl, combine the cantaloupe, cucumber, feta, and half the basil. Drizzle with olive oil and vinegar, season with salt and pepper, and toss to coat. Serve the salad topped with the toasted sunflower seeds, flaky salt, and more pepper.

    From Food52.com by Kendra Vaculin, https://food52.com/recipes/30433-cantaloupe-cucumber-salad-with-basil-feta

    Summertime Potluck Puttanesca

    • 2 handfuls broccoli florets
    • 1 pound tubular pasta, such as campanelle or penne
    • 2 medium summer squash, preferably yellow, trimmed, halved lengthwise and sliced very thinly crosswise
    • 2 garlic cloves, minced (remove any green shoots first)
    • about 1/4 cups basil chiffonade (a moderate handful: 10 or so large leaves)
    • 1 teaspoon hot pepper flakes, or to taste
    • 20 kalamata olives, pitted and sliced
    • 1/4 cup capers, drained and rinsed
    • Lemon juice to taste (start with half a lemon and adjust from there)
    • 1 28-ounce can good quality crushed tomatoes (like San Marzano)
    • 1/2 cup extra virgin olive oil
    • Salt and pepper to taste

    Bring a large pot of well-salted water to a boil (it should be so salty that it tastes like sea water). Have a large bowl of ice water ready, as well. Blanch the broccoli florets for 2 minutes, then remove them with a spider or slotted spoon and shock them in ice water. Drain and set aside. Cook the pasta until al dente in the same water used to blanch the broccoli.

    While the pasta is cooking, combine the broccoli florets and all the remaining ingredients in a large bowl. Drain the pasta and add it to the bowl. Adjust for salt, pepper, lemon juice, and hot pepper. The dish is equally good warm or cold, but I’d recommend allowing it to sit for at least an hour or, if planning ahead, let it sit overnight to extract the maximum flavor potential.

    From Food52.com by Chris Hagan, https://food52.com/recipes/22621-summertime-potluck-puttanesca

    Summer CSA Share #18

    Welcome to the 18th share of the Pitchfork & Crow 2022 Summer CSA! Here’s what’s in the share this week:

    • Escarole – A little hardier than lettuce, escarole will stand up to wilting or a little cooking. We like to use it as a base for warm pasta or salmon topped with your favorite sauce/dressing.
    • Brussels Sprouts Tops – We snap the tops off our Brussels sprouts to help the plants focus on making sprouts. At some point we realized these tops are really tasty and we should all be eating them. Treat them like kale in the kitchen.
    • Broccoli
    • Cauliflower
    • Cilantro
    • Dill
    • Celery
    • Huckleberry Gold Potatoes – A new-to-us purple skinned, yellow flesh potato variety.
    • Torpedo Onion
    • Delectable” Sweet Corn
    • Romano Beans – Mixed green and purple striped beans, great for use in your favorite green bean recipes.
    • Zucchini & Summer Squash – Including green zucchini, yellow summer squash, and “Mexicana” zucchini.
    • Mixed Cucumbers – Including green cukes, ‘Silver Slicer’ yellow cukes, and lemon cukes.
    • Sweet & Shishito Peppers
    • Mixed Cherry Tomatoes
    • Mixed Slicer Tomatoes
    • Melon – Choose from Tuscan, Lambkin (aka Christmas), Honey Orange honeydew, and watermelons.
    Tuesday’s sunrise.

    We’re sure looking forward to fall and some milder temperatures. Oh, the official start of fall was last week you say? It’s nearly October you say? It’s been hard to tell with highs in the upper 80s the past few days. We’re wringing out the last bits of summer, thankful for some warmth to keep the melons ripening, but hopeful for some rain in the forecast too. Can irrigation season be over already?

    We have water rights! (left) and bok choy ready to be transplanted (right).

    Fun news that came through this week, actually associated with irrigation season, is that our water rights were officially issued by the Oregon Water Resources Department (OWRD)! Our dry summers mean access to water makes growing vegetables a lot easier but there’s not always enough water to go around for everyone that wants to use it . When we started leasing this farm back in the fall of 2010 we knew water rights were crucial but the previous owners hadn’t finished the process to secure water rights when they put in the irrigation well. As land renters we started the wheels turning, hoping to know if we’d have legal access to the water before we purchased the property. It turns out the government doesn’t move that quickly.

    The folks at the OWRD suggested we would likely get the water right issued from the beginning but there were some steps that had to be undertaken first. Of course there was paperwork to submit, then came 7 years of annual well tests to confirm our aquifer was holding steady from year to year and not being depleted by our summer irrigation use. We also had to hire a professional surveyor to research and map our property and irrigation use areas and demonstrate that our proposed irrigation plan matched the capacity of well. And there was the local company that messed up our flow test (an hours long wide open discharge of water to see if the rate changed over time) and it had to be re-done. (Thanks for the help with that one Jen!) It’s been a journey.

    We submitted the final paperwork pieces several years ago and the OWRD said to watch out for a confirmation within the decade. I guess they’re backed up over there. That’s why we were surprised to receive a letter in the mail earlier this summer outlining our water right and asking us to confirm everything was correct and then another letter this week showing that our water right has been issued. It only took 12 years but we’re happy to be wrapping up this irrigation season with our water right in hand!

    Frog friends!

    This past week saw a slowdown in our productivity. I think we’re feeling the season. Jeff did manage to prep the last greenhouse for planting and I hoed in two of the other greenhouses that are filling up with direct sown fall/winter radishes and greens. And tomato sauce was canned and we bought a life changing shelf for our kitchen. Yes, sometime you just need to buy a shelf to upgrade life. We harvested potatoes and sowed (maybe) the last round of lettuce for future transplanting. And we filled up the Winter CSA in record time! Many thanks to everyone who jumped onboard for the upcoming season!

    Enjoy the vegetables and we’ll see you here next week!

    Your farmers,
    Carri Heisler & Jeff Bramlett

    .

    Here are a few recipes to get you inspired:

    Slightly Exotic Skillet Broccoli & Cauliflower

    • 1 large onion, thinly sliced (pole to pole)
    • 1 head of cauliflower, trimmed and separated into florets, large florets cut in halves
    • 1 head of romanesco or broccoli, trimmed and separated into florets, large florets cut in halves
    • 3/4 teaspoon red pepper flakes
    • 3 medium cloves garlic, coarsely chopped, and divided
    • Freshly ground black pepper
    • 1 teaspoon brine from preserved lemons
    • 1 preserved lemon, rinsed
    • 12 to 15 Castelvetrano olives, pitted and coarsely chopped
    • 2 small to medium red peppers, roasted, seeded, peeled, and diced
    • 1 tablespoon Sherry vinegar
    • 1/2 teaspoon ground cumin
    • 1/2 teaspoon smoked paprika
    • 2 to 3 tablespoons cilantro leaves (or substitute Italian parsley)

    Heat 3 tablespoons of olive oil in a 12-inch cast iron or other non-stick skillet over medium-high until shimmering. Add sliced onions and cook, stirring frequently, until softened and starting to brown, about 5 minutes. Add cauliflower and romanesco/broccoli, and evenly distribute in a single layer. (The pan should be crowded, but if you cannot create a single layer remove a few florets.) Take a minute to wiggle each piece into place to get some surface contact on each floret. Turn the heat down to medium-low. Sprinkle the red pepper flakes and all but 1/2 teaspoon of the chopped garlic over the brassicas. Season with ground black pepper, and sprinkle on the brine from the preserved lemons. Set a timer for 25 minutes.

    While the brassicas are cooking, prep your lemon and make your dressing. Quarter the preserved lemon, and use a spoon to scrape out the pulp. Remove the seeds from the pulp and put the pulp in your blender. Coarsely chop one quarter of the peel, and add it to the blender. Dice the remaining peel and set aside. To the blender add the reserved chopped garlic, all but 1 heaping tablespoon of the diced red pepper, sherry vinegar, cumin, and paprika. Blend until smooth. Scrape down the sides of the blender jar, then while running slowly pour in the remaining olive oil. Taste and add a splash or two more of vinegar if the dressing isn’t tangy enough. Set aside. (NOTE: This step could also be done ahead, just re-blend dressing prior to serving if any separation has occurred.)

    After your timer has gone off, check a couple of florets for caramelization. If needed, cook an additional 5 or so minutes. Otherwise scatter the reserved red pepper, diced preserved lemon, and chopped olives over the brassicas. Cover the pan and allow to steam for 5 to 10 minutes as needed to cook the florets through, but still maintain some texture.

    Transfer to a serving platter. Garnish with cilantro just before serving. Drizzle with dressing, and serve the rest on the side. (Note: The brassicas will be under-seasoned without the dressing.)

    From Food52.com by HardLikeArmour, https://food52.com/recipes/24362-slightly-exotic-skillet-broccoli-and-cauliflower

    Jane Grigson’s Celery Soup

    • 1/2 pound celery, chopped (outside stalks or celeriac — about 2 cups)
    • 1/2 cup chopped onion
    • 1/2 cup diced potato
    • 6 tablespoons butter
    • 4 cups turkey or chicken stock
    • 1/2 cup milk (optional, up to 1 cup)
    • 1 teaspoon dill weed (2 teaspoons for fresh dill)
    • 2 1/2 tablespoons cream

    Stew celery, onion, and potato gently in the butter in a covered pan for 10 minutes. Don’t let the vegetables brown. Add stock or water and 1/2 teaspoon of dill weed. Simmer for 20 minutes if you have a blender, 40 minutes if you use a food mill.

    Blend or purée the soup. Pour through a strainer into a clean pan (to remove the last few threads of celery), adding a little milk if too thick. Bring slowly to just under the boil, seasoning with salt, pepper and more dill weed if required.

    Put the cream into the soup dish, and pour the soup in on top. Swirl round with the ladle before serving, to mix in the cream.

    From Food52.com by GeniusRecipes, https://food52.com/recipes/26523-jane-grigson-s-celery-soup

    Classic Waldorf Salad

    • 1 cup diced apples
    • 1/2 cup diced celery
    • 1/2 cup chopped walnuts
    • 1/2 cup mayonnaise
    • 5 leaves escarole or chicory, chopped and stems removed
    • Smoked paprika, for garnish

    In a medium bowl, mix apples, celery, walnuts, and mayonnaise. Arrange chopped lettuce on four plates and top with apple mixture. Sprinkle paprika on salad to finish.

    From Food52.com, https://food52.com/recipes/36688-classic-waldorf-salad

    Summer CSA Share #17

    Welcome to the 17th share of the Pitchfork & Crow 2022 Summer CSA! Here’s what’s in the share this week:

    • Salad Mix
    • Broccoli
    • Savoy Cabbage
    • Parsley
    • Fennel – We know members like roasted fennel, fennel pickles, and shaved fennel salads. Our favorite way to eat fennel is caramelized onion and fennel tart. We cook down the onion and fennel, toss it into a pastry galette style, top it whatever mix of cheeses we have on hand and bake until the pastry it cooked.
    • Beets Click here for a flashback to a standby recipe suggestion for beets and parsley. Scroll up on that page for a glimpse at farm life back in 2013.
    • Sweet Onions
    • Delectable” Sweet Corn
    • Romano Beans – Mixed green and purple striped beans, great for use in your favorite green bean recipes.
    • Zucchini & Summer Squash – Including green zucchini, yellow summer squash, and “Mexicana” zucchini.
    • Mixed Cucumbers – Including green cukes, ‘Silver Slicer’ yellow cukes, and lemon cukes.
    • Sweet & Jalapeno Peppers
    • Mixed Cherry Tomatoes
    • Mixed Slicer Tomatoes
    • Pears – Asian & Bartlett
    A preying mantis friend in the winter squash field (top left), zinnia enjoyment (top right), and picking beans (bottom).

    Thursday marks the autumnal equinox, the point in the year when the light hours and dark hours are equal lengths. Going forward we’ll be losing daylight hours until we reach the winter solstice on December 21st. If you weren’t already feeling the seasonal shift I imagine it will start to become apparent as we’re plunged into more time in the dark. The shift has certainly been happening on the farm as plant growth has slowed and powdery mildew has begun to set in on some crops. The zucchinis are putting on fewer fruits, the cucumbers are slowing down, the tomatoes are on the decline.

    Winter squash!

    One harbinger of autumn for us is the ripening and harvesting of winter squash. We grew 12 different types of winter squash this season including varieties of pumpkins, kabocha, spaghetti, delicata, butternut, and acorn squash. Some will make appearances in upcoming fall shares but most will be headed to Winter CSA shares.

    The wet start to the season made for rough conditions for cultivating the winter squash field right out of the gate. It wasn’t dry enough to get the cultivating tractor through the beds before a sea of grass took hold. A couple of times we made inroads through hoeing and hand weeding once the plants started to spread out and the tractor really couldn’t make a pass, but the grass wasn’t deterred and our half acre of winter squash was a mess most of the season. Needless to say we dreaded the harvest and assumed the worst.

    This past week we finally made time to tackle the harvest project. Thankfully it wasn’t quite as dismal as we’d expected, though in the end it was maybe half of last year’s haul. Upside, it takes up less space in the barn. Downside of course, we’ve got less squash to share in the coming months. Thankfully we will have some to share though; there will be pumpkin pies this year!

    Smoky sunset last night.

    With the winter squash harvest behind us and that field mowed we can now focus on cleaning up some other areas. In the week ahead you can find us weeding, cultivating, mowing, and weed whacking in order to wrestle some semblance of control back in several areas. We’ve got a greenhouse to transplant into and an organic fertilizer run to make before that can happen. And we’ve got flint corn to harvest for future corn flour and polenta eating. The days may be getting shorter but we’ve still got plenty of things that need doing to pack into them.

    Enjoy the vegetables and we’ll see you here next week!

    Your farmers,
    Carri Heisler & Jeff Bramlett

    .

    Here are a few recipes to get you inspired:

    Baked Olive, Tomato, and Feta Dip

    • 1/4 cup tomato sauce, homemade or store-bought (a teeny amount! so the cheese doesn’t stick to the bottom! a perfect use for leftovers or the dregs of the jar)
    • 8 ounces block of feta cheese, drained
    • 1/2 cup pitted and roughly chopped Kalamata olives
    • 1 1/3 cups halved cherry tomatoes
    • 2 cloves garlic, finely grated
    • 1 teaspoon dried oregano
    • 1 tablespoon chopped fresh parsley
    • a few turns fresh ground pepper
    • toast, crackers, pita, and/or a spoon for eating

    Preheat the oven to 400° F.

    Pour the tomato sauce into the bottom of a small oven-safe dish (I used a 6–inch round). Place the feta in the center and press to slightly break the block apart. This is a rough-crumbly-spreading situation, not a make-a-clean-cheese-layer situation.

    In a medium bowl, mix the olives, tomatoes, garlic, oregano, and pepper — you don’t need to season with salt, as the feta is salty enough on its own. Pour the mixture evenly over the cheese.

    Bake for 15 minutes. Your kitchen will smell like pizza and the feta will get warm and spreadable. Top with the parsley once it’s out of the oven.

    Serve to guests with toast or crackers, or stuff into a pita pocket with a fried egg and arugula for a meal for yourself.

    From Food52.com by Kendra Vaculin, https://food52.com/recipes/37883-baked-olive-tomato-and-feta-dip

    Cabbage, Italian Sausage, and Orzo Soup with Parmesan

    • 2 tablespoons extra-virgin olive oil
    • 1 pound Italian sausage (mild or spicy), bulk or with casings removed
    • 1 yellow onion, finely chopped
    • 1 teaspoon kosher salt, plus more to taste
    • 1 pinch freshly ground black pepper, plus more to taste
    • 2 garlic cloves, finely chopped
    • 1/4 cup tomato paste
    • 1 large Napa or Savoy cabbage (about 2 pounds), trimmed, quartered, and thinly sliced
    • 4 cups chicken stock, homemade or low-sodium store-bought
    • 4 cups water
    • 3/4 cup orzo
    • 1 or 2 Parmesan rinds
    • 1/3 cup chopped Italian parsley
    • 1 teaspoon red wine vinegar, or to taste
    • 1/2 cup grated Parmesan

    Heat olive oil in a large thick-bottomed pot or Dutch oven over medium heat. Add sausage in a single layer and brown, breaking it into bite-sized pieces and stirring occasionally, until it is just cooked through and no longer pink. Remove with a slotted spoon, leaving the rendered fat in the pot.

    Add the onion and several big pinches of kosher salt and black pepper. Saute for about 4 minutes, then add the garlic and saute for another 1 minute. Lower the heat, and add the tomato paste and continue cooking, stirring constantly and scraping the bottom of the pot, until it caramelizes and starts to change in color from bright to brick red, about 3 minutes. (Don’t rush this step; the caramelized paste adds depth and complexity to the soup.)

    Add the cabbage, chicken stock, water, orzo, Parmesan rind(s), and another big pinch or two of salt. Simmer, uncovered, for 10 minutes, stirring and scraping the bottom of the pot occasionally to ensure nothing sticks. Add sausage and simmer for 5 to 8 minutes longer, stirring and scraping occasionally, until the orzo and cabbage are tender. Remove and discard rinds.

    At the end, add parsley and red wine vinegar. Adjust salt and acidity to taste. Serve the soup in bowls, topped with grated Parmesan.

    From Food52.com by EmilyC, https://food52.com/recipes/84039-sausage-cabbage-soup-recipe-with-orzo-parmesan

    Quinoa with Roasted Beets and Pear

    • 2 cups cooked quinoa (I prefer red)
    • 2 medium-sized beets, scrubbed (I like a mix of colors)
    • 1/4 cup walnuts
    • 1 large pear, cubed
    • 3 ounces crumbled feta
    • 1 splash olive oil
    • 1 splash Balsamic vinegar
    • 1 pinch salt and pepper, to taste

    Preheat your oven to 400° F.

    Slice off the leaves at the top of the beets. Drizzle with a little olive oil, and then wrap each individually and loosely in tin foil. Place on a baking sheet and roast for 40 to 50 minutes, or until soft enough that you can easily stab one with a fork and it doesn’t give you any problems. Unwrap and set aside to let cool; once touchable, run the beets under water to slide the skin off. Cut beets into cubes.

    Lower your oven temperature to 350° F. Spread walnuts out in a single layer on a baking sheet and toast for 8 minutes. Allow the nuts to cool before giving them a rough chop.

    Assemble the salad by dumping everything together into a bowl because you, brilliant human, know that that’s how salads work. Quinoa, beet cubes, pear cubes, walnuts and feta, a.k.a. the dream team. Toss with a slight drizzle of balsamic, a little olive oil, and some coarse salt and freshly ground pepper. Did you know this is awesome warm or cold? It is. Bring it to work for lunch the next day because it will be bitchin’ straight from the fridge, and your coworkers will be like ughhhhhhh.

    From Food52.com by Kendra Vaculin, https://food52.com/recipes/31742-quinoa-with-roasted-beets-and-pear